Typical nowadays of basics by building a REST API with the Scala/Play Framework with Reactive Mongo and Mysql Integration with Mobile App SwifUI.
Chapters
Introduction Play framework, Slick, MySQL, MongoDB and SwifUi | Part I
Play framework, Slick and MySQL | Part 2
Play framework, Slick and mongoDB | Part 3
Play framework Unit Testing | Part 4
Responses model in Scala | Part 5
Saving JSON to Scala model | Part 6
How to make the Scala compiler to review your code | Part 7
Scala Enumerations | Part 8
Scala Enumerations - Return of the (Java) Jedi | Part 9
Scala interview questions | Part 10
Handling exceptions in Scala | Part 11
Why you should think twice before using Tuples | Part 12
Creating forms on your Play application | Part 13
Deploy on Kubernetes | Part 14
Are Scala Streams really lazy | Part 15
Play Framework and Slick example updated | Part 16
First steps into RabbitMQ | Part 17
Type safe builder pattern | Part 18
Implementing Authentication on Play Framework | Part 19
Scala tutorials in Baeldung | Part 20
Prerequisite
Scala Play framework and SwiftUI. Before going any further, please make sure that you have the following tools installed on your local machine.
JVM 14
Scala 2.13.3
Play Framework
Sbt 1.3.13
Docker (Optional)
SwiftUi
Xcode
CI/CD JENKINS
Mysql
MongoDB
Play Framework
"Play is based on a lightweight, stateless, web-friendly architecture. Built on Akka, Play provides predictable and minimal resource consumption (CPU, memory, threads) for highly-scalable applications."
Programming Language One of the secrets that makes Java a powerful programming language, is the JVM (Java Virtual Machine). This has led to develop programming languages more modern that run over it, like Kotlin, JRuby, Jython, Apache Groovy, Clojure, Scala. Play is developed on Scala, which allows us the versatility of using Java, Scala or both.
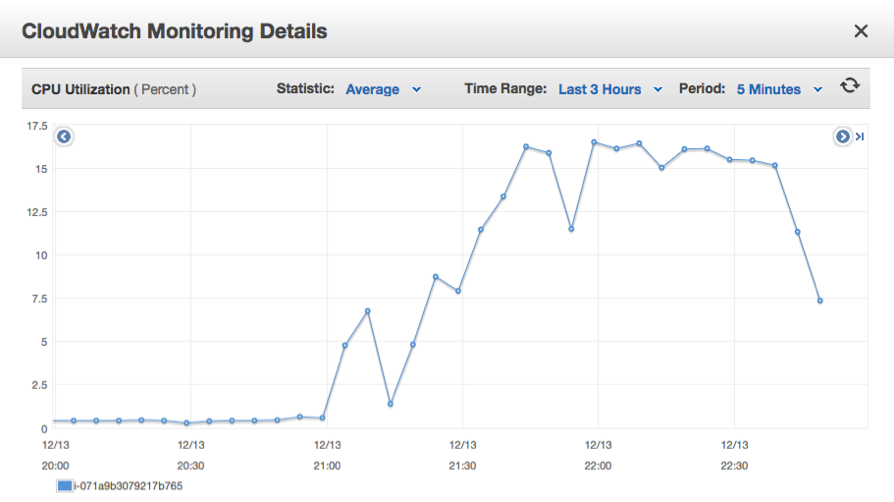
Resources Consumption
Something impressive about Play is the low resources consumption. The previous image shows the performance of the server’s CPU during stress tests. Those tests was made during a period of 3 hours, where up to 50 requests were sent simultaneously. The graphic show us that it was not used more than 17.5% of the CPU during the tests.
Now, answer this question. How many resources do you believe that have this server for can handle those tests?, well the server is an Amazon EC2 Instance, with OpenSuse, 1 CPU and 1GB of RAM. Really impressive.
Reactive Framework
Less Configurations
Play comes preconfigured with Akka since his version 2.6.x, in the last versions with Netty. That makes that we don’t need to configure an App Server in our development environments, and production, QA, and development servers.
JRebel Behavior
When we develop with Java, one of the more unpleasant things can be make redeploys everything when we want to test something. That process can be annoying, indeed when we make it with IDEs help, especially because that consumes time. With Play we only need to save our job an refresh for see our changes. I like to call that “More Code, and Less Deploys”
Start and Structure
For develop with Play Framework we need SBT, a build tool for Scala and Java. You can download it and see the configuration instructions in the oficial Web Site, You need to have install the Java JDK.
Creating a New Project
Once installed SBT, we can start. For create a new proyecto you can use one of the next commands:
run the next command for start a Java based project
$ sbt new playframework/play-java-seed.g8
Next, will request you basic information for the creation of the project, such as the name, the package, the version of Scala, Play and SBT to use. If you do not enter anything and only press return, it will put the default values.
This template generates a Play Java Projectname [play-java-seed]: PlayJava
organization [com.example]: com.auth0
scala_version [2.12.4]:
play_version [2.6.10]:
sbt_version [1.0.4]:Template applied in ./PlayJava
run the next command for start a Scala based project
$ sbt new playframework/play-scala-seed.g8
Next, will request you basic information for the creation of the project, such as the name, the package, the version of Scala, Play and SBT to use. If you do not enter anything and only press return, it will put the default values.
This template generates a Play Scala Projectname [play-java-seed]: PlayScala
organization [com.example]: com.auth0
play_version [2.6.10]:
sbt_version [1.0.4]:
scalatestplusplay_version [3.1.2]:Template applied in ./PlayScala
Making Deploy
For the purposes of this article we will use the Java project, nevertheless you can found in the GitHub repo the code for both Java and Scala.
For can make deploy we need to go inside the project’s directory, in this case playjava/
$ cd playjava/
Once inside the folder we execute the command sbt run, and will happen the next
$ sbt run[info] Loading settings from plugins.sbt,scaffold.sbt …
[info] Loading project definition from C:\Users\itrjwyss\Documents\PlayJava\project
[info] Loading settings from build.sbt …
[info] Set current project to java (in build file:/C:/Users/itrjwyss/Documents/PlayJava/) — — (Running the application, auto-reloading is enabled) — -[info] p.c.s.AkkaHttpServer — Listening for HTTP on /0:0:0:0:0:0:0:0:9000(Server started, use Enter to stop and go back to the console…)
Now we can go to our browser or client to test RESTful services like Insomnia, and loadhttp://localhost:9000

Voilà, Play is Running
Voilà, we have running our Play application. If you go to the console you will see
(Server started, use Enter to stop and go back to the console…)[info] p.a.h.EnabledFilters — Enabled Filters (see <https://www.playframework.com/documentation/latest/Filters>):play.filters.csrf.CSRFFilter
play.filters.headers.SecurityHeadersFilter
play.filters.hosts.AllowedHostsFilter[info] play.api.Play — Application started (Dev)
Everything you see in the console is recorded in the Play logs file.
Basic Structure
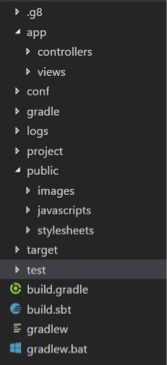
Basic Project Structure
app: in this directory willhave all our source code (controllers/) and our html templates (views/).
conf: in this directory are the configuration files for our Play application.
logs: in this directory you will find the Play’s logs file.
project: in this directory you will find the SBT’s configuration files.
public: static assets directory, like images, css style files, and javascript files.
test: Sources to be able to carry out unit tests. Play is based on JUnit to perform this action.
Now let’s see a bit of the general syntax that Play handles. The first files that we will visit will be those located in the app/views/ directory, there we have two files the main.scala.html and index.scala.html.
See first main.scala.html
@*
* This template is called from the `index` template. This template
* handles the rendering of the page header and body tags. It takes
* two arguments, a `String` for the title of the page and an `Html`
* object to insert into the body of the page.
*@
@(title: String)(content: Html)<!DOCTYPE html>
<html lang=”en”>
    <head>
        @* Here’s where we render the page title `String`. *@
        <title>@title</title>
        <link rel=”stylesheet” media=”screen” href=”@routes.Assets.versioned(“stylesheets/main.css”)”>
        <link rel=”shortcut icon” type=”image/png” href=”@routes.Assets.versioned(“images/favicon.png”)”>
    </head>
    <body>
        @* And here’s where we render the `Html` object containing
        * the page content. *@
        @content        <script src=”@routes.Assets.versioned(“javascripts/main.js”)” type=”text/javascript”></script>
    </body>
</html>
@()@main(“Welcome to Play”) {
    <h1>Welcome to Play!</h1>
}
One of the virtues of Play in terms of Frontend development that is worth mentioning, although that is not the objective of those series of articles, is the inheritance between templates. In this case, index.scala.html inherits from main.scala.html. Much of the magic of its html syntax occurs with @, we can notice that it uses it for comments, insert blocks of code, define receive parameters and even inheritance as can be seen with @main () in index.scala.html, this indicates that index inherits from the main template. In main we can see the @content, which indicates that there will be inserted the html code, in this case index.
Let’s continue to see the structure of a Controller, theplace where all the magic happens. Play is based on the MVC model, the Models are DB’s admin structures, the Views our html templates, and the controllers, well Play Controllers. Another important aspect of Play is that RESTful is a first citizen, so everything is a RESTful, the controllers are in the app/controllers/ directory.
package controllers;import play.mvc.Controller;
import play.mvc.Result;/**
 * This controller contains an action to handle HTTP requests
 * to the application’s home page.
 */public class HomeController extends Controller {    /**
     * An action that renders an HTML page with a welcome message.
     * The configuration in the <code>routes</code> file means that
     * this method will be called when the application receives a
     * <code>GET</code> request with a path of <code>/</code>.
     */    public Result index() {
        return ok(views.html.index.render());
    }}
Play works through Actions, an action is just a method in charge of processing Request’s Parameters and producing a Result that will be sent to the client. Therefore, it is the implementation of a WS RESTful. On the other hand, a Controller is nothing more than a class that inherits from play.mvc.Controller and is responsible for managing a set of actions.
To finish with the structure of a Play project that we must control, we will talk about how the routes are handled, for this we will explore the routes file in the conf/ directory.
routes
# Routes
# This file defines all application routes (Higher priority routes first)
# ~~~~# An example controller showing a sample home page
GET / controllers.HomeController.index# Map static resources from the /public folder to the /assets URL path
GET /assets/*file controllers.Assets.versioned(path=”/public”, file: Asset)
The syntax of the routes file is in Scala, here we can include comments with #, the next is the structure of the routes. The first thing we must indicate is the http method that we will use (GET, POST, PUT, DELETE, PATCH, HEAD, OPTIONS) or we can use * to indicate that it can be consumed by any of the methods.
The next thing to indicate, is how the action will be called, this name will be added to our domain. For example, if our domain were auth0.com and we had a definition like the following
GET /pathExample
This action would be call: auth0.com/pathExample
Finally, we must indicate to what action this route will redirect. For this example, assume that within our Controller HomeController we have the pathExample action, so the final route would look like this:
GET /pathExample controllers.HomeController.pathExample
In this article wehave covered basic aspects about Play. Wait for the next series of this articles, when we will talk about develop RESTful Services.
Developing Web Services
Let’s see in more detail the index action in HomeController.
public Result index(){
    return ok(views.html.index.render());
}
Remember that RESTful is a first citizen in Play Framework, which means that all actions are RESTful Services. The structure of an action is simple, it always returns an object of type Result (play.mvc.Result), Result is the representation of an HTTP result with an state code, headers, and a body that is send to the client.
For example, in the index action we use the ok method to return a Result that renders an html in the body. Instead of render an html in the body, we can send a plain text. For this we will add a new action in our HomeController call plainText.
public Result plainText(){
    return ok("This is just a text message.");
}
Once we have added the action, we must add this to the routes file in order to execute it.
GET . /plainText . controllers.HomeController.plainText
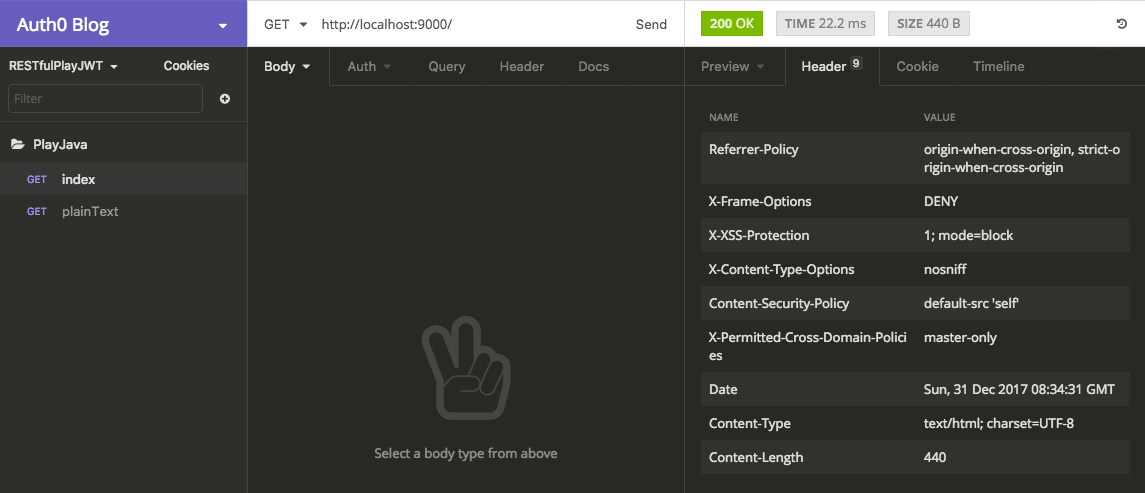
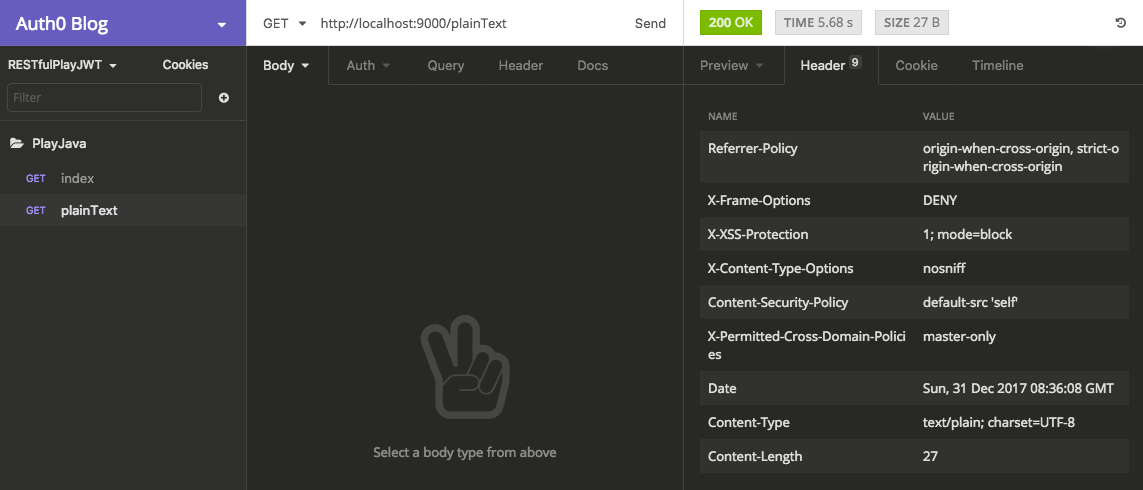
Now we can compare the differences between call the index and plain actions from Insomnia.

Index Response
Index Headers

plainText Response
plainText Headers
The first difference as you can imagine between both is the body, for index we render an html, while for plainText we show a plain text. The following difference lies in the Header Content-Type, for index return “text/html” and for plainText “text/plain”
Handling JSONs
When we develop Web Services we seek to use an information exchange protocol, such as JSON. Play Framework is based on the Jackson library for the handling JSONs, using the JsonNode object of this, and leaning on the play.libs.Json API. To start our journey developing RESTful Services that return JSONs, we will start by importing play.libs.Json in our HomeController.
import play.libs.Json;
The first thing we will do is render a JSON using the HashMap object, adding to our HomeController an action called jsonMap, which will look like this
public Result jsonMap(){
    HashMap<String, Object> result = new HashMap<String, Object>(){
        {
            put("str", "String");
            put("int", 123);
        }
    };
    return ok(Json.toJson(result));
}
As you can see, the only thing we did here was create a HashMap, to which we added two elements “str” and “int” with their respective values. Then using the toJson method of the Json API we indicate that we want to return the HashMap in JSON format. To see how the consumption of this new service looks from insomnia, we will define the call to this action in our routes file.
GET . /json/map . controllers.HomeController.jsonMap

jsonMap Response
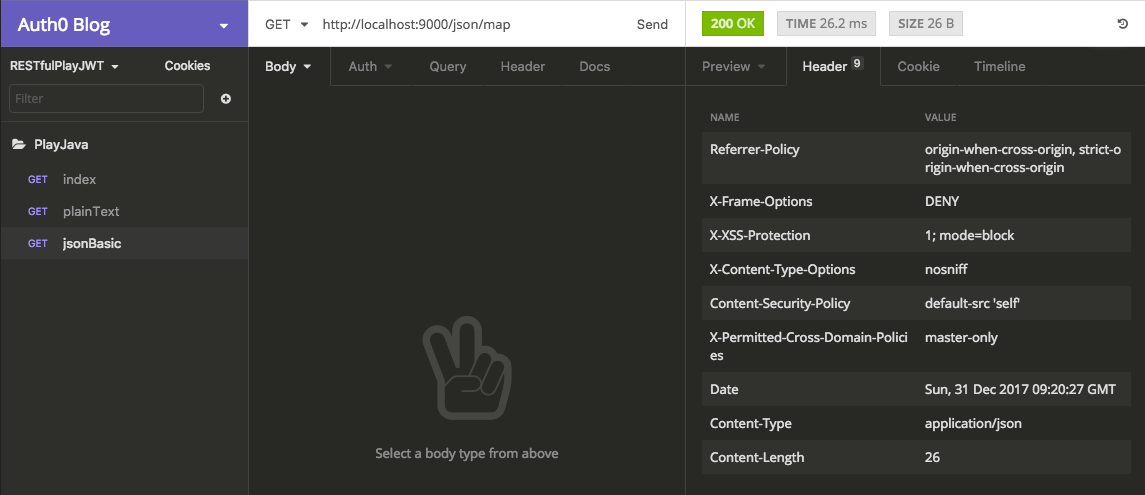
jsonMap Header
This is an example to render as JSON a HashMap, to continue we will do it with an object. For this we will define a class called Invoice, which will be inside the package com.auth0.beans that we will create at the same level as the controllers directory, can be seen the image.
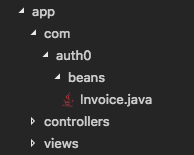
Note: for readability of the article we do not include the get and set methods of the Invoice class.
package com.auth0.beans;import java.math.BigDecimal;
import java.time.LocalDate;public class Invoice {    private String name;
    private String address;
    private String idNumber;
    private String code;
    private LocalDate date;
    private BigDecimal amount;    public Invoice(){}    public Invoice(String name, String address, String idNumber,
                   String code, LocalDate date, BigDecimal amount){
        this.name = name;
        this.address = address;
        this.idNumber = idNumber;
        this.code = code;
        this.date = date;
        this.amount = amount;
    }}
Then we will add the action jsonObject in our HomeController, in which we will create an object Invoice and we will use the same method toJson of the Json API to return it as a response to the client. The action would be like the following code
public Result jsonObject(){
    Invoice invoice = new Invoice("Perico", "City", "123456-7",
                                  "002245", LocalDate.now(),
                                  new BigDecimal(1293));    return ok(Json.toJson(invoice));
}
We will define the call to this action in our routes file
GET . /json/object . controllers.HomeController.jsonObject

jsonObject Response
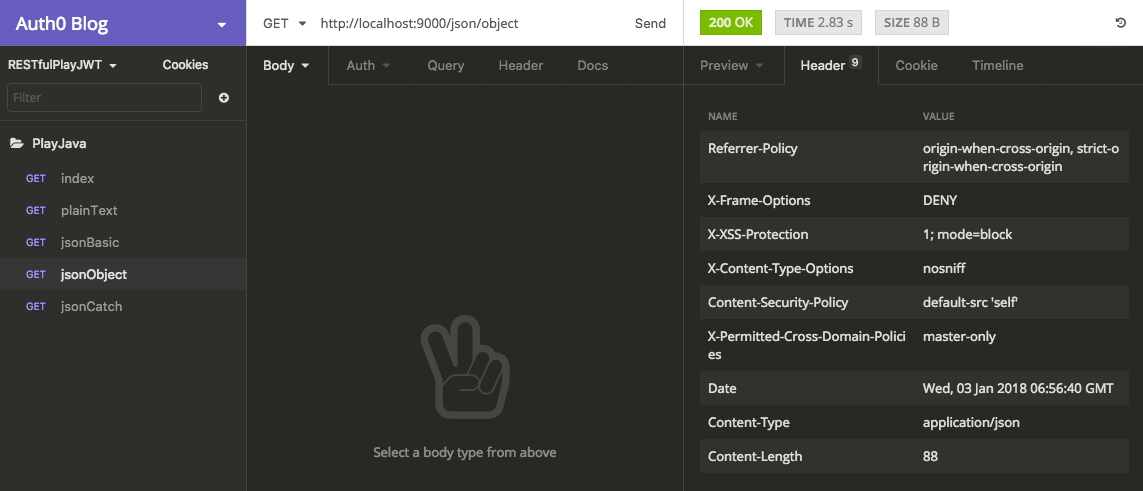
jsonObject Headers
To finish with the JSONs Handling, we will do it by obtaining a JSON in the request of our RESTful service. For them we will add the jsonCatch action in our HomeController. In it we will obtain a JsonNode from the body of our request, then we will use the fromJson method of the Json API to convert this JsonNode into the object we want, in this case Invoice. To finish we will return a String with some of the data of our Invoice object to guarantee that we have obtained the information that we sent in the test. The final result would look like the following code:
public Result jsonCatch(){
    JsonNode jsonNode = request().body().asJson();
    Invoice invoice = Json.fromJson(jsonNode, Invoice.class);

    DateTimeFormatter f = DateTimeFormatter.ofPattern("dd/MM/yyyy");

    return ok(invoice.getCode() + " | " + invoice.getIdNumber()
              + " | " + f.format(invoice.getDate()));
}
We will define the call to this action in our routes file
GET . /json/catch . controllers.HomeController.jsonCatch

jsonCatch Request and Response
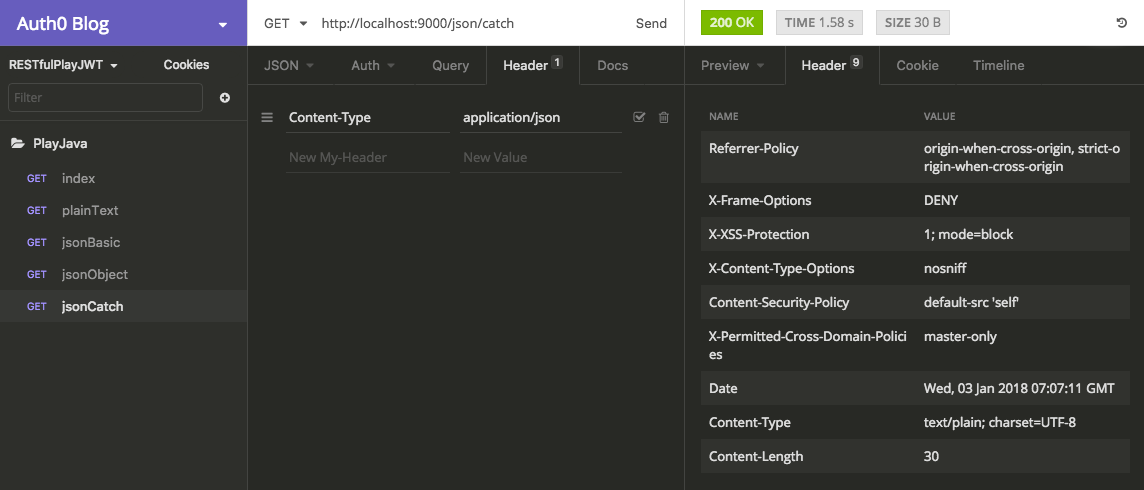
jsonCatch Headers
Results in More Detail
We have seen throughout our examples that actions always return the Result object, which we have previously indicated is the representation of an HTTP response with a status code, headers and a body that is sent to the client. The Controller object already has a series of methods that allow us to create that Result, those methods inherit them from the Results class (play.mvc.Results). In the case of the examples that we have listed in this article, only the ok method has been used, which returns the status code 200, in the body we have rendered html, text and JSONs.
But there are other methods in Results that can help us, in circumstances where we need is to return a status code different to 200, some of the most common are:
notFound(); //Return state code 404
badRequest(); //Return state code 400
internalServerError(); //return state code 500
status(203); //return a custom state code
Imagine that in our jsonCatch action we don’t obtain the JSON that we expect in the body, we should indicate a badRequest. To exemplify this, we will add a new action called jsonBadRequest to our HomeController
public Result jsonBadRequest(){
    JsonNode jsonNode = request().body().asJson();
    if(jsonNode == null){
        return badRequest("Expecting Json data");
    }else{
        Invoice invoice = Json.fromJson(jsonNode, Invoice.class);
        DateTimeFormatter f =
                  DateTimeFormatter.ofPattern("dd/MM/yyyy");
        return ok(invoice.getCode() + " | " + invoice.getIdNumber()
                  + " | " + f.format(invoice.getDate()));
    }
}
In this example we are returning a plain text in the badRequest, just like in ok, here we can also render an html, text or send a JSON. In order to try this new action in Insomnia we must add it to our routes file.
GET /json/badRequest controllers.HomeController.jsonBadRequest

jsonBadRequest Request and Response
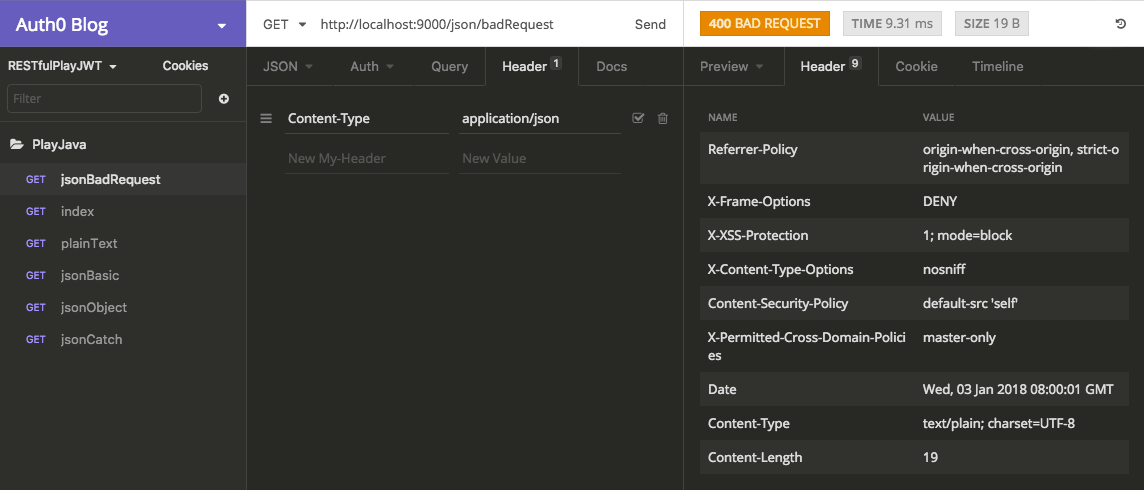
jsonBadRequest Headers
To further delve into the methods inherited from Results you can see the official documentation of play.mvc.Results. As we mentioned previously, in the index example, an html template is rendered. To adapt it to what we want, we have to make it no longer render the html, but what we want.
In this article we have talked about how to develop Synchronous RESTful Services in Play Framework, returning and obtaining JSONs. You can access the source code by visiting the repository on GitHub. In the next series of these articles we will be talking about the use of JWT for a more secure information exchange.
\=====\===\====\=====\==================
Set up a local mongo db server using to following commands:
> mkdir mydata
> docker pull mongo:latest
> docker run --name local-mongodb -d -p 27017:27017 -v ~/data:/data/db mongo
The project setup
The first part consists of creating the project and add required dependencies, Open a terminal. Navigate to directories (cd) to the folder that will contain the project folder. Run the following command and response to the prompts to create a new project template
Seed the project:
The first step is to create our project skeleton. This can be easily done using this sbt command:
> sbt new playframework/play-scala-seed.g8
This creates a new project with one controller (in the app/controllers directory), two HTML files (in the app/views directory), and a basic configuration (in the conf directory).
As we don’t need them, let’s remove HomeController.scala, index.scala.html, and main.scala.html files. Let’s also remove the existing content of the routes file. You’ll be asked to fill in some basic information about the project such as the name of the package and the organization.

This template generates a Play Scala projectname [play-scala-seed]: movie-store
organization [com.example]:Template applied in ./movie-store
If everything goes well, it should be able to start the application with this command.
> sbt run

Add dependencies
The reactive mongo plugin for Play 2.8 can be enabled by adding the following dependencies:
Dependencies to enable reactive mongo.
The mongo driver will be resolved automatically as transitive dependency.
To enable dependency injection for reactive mongo module. Add the following line into the application.conf.
Enable dependency injection for reactive mongo.
Configure database access:
The last step is to configure the database access.
Database access
The API
Now that the project is ready, move into next step that consists of creating the models, repositories, and controllers. I’m going to keep the example simple as much as possible but it should be good enough for our purposes.
The model:
Movie Model
As you can see, we have a basic case class that contains the definition of a movie and a companion object that contains the implicit JSON/BJSON serializers.
For JSON serialization we’re using automated mapping. Basically, the Json.format[Movie]macro will inspect the movie case class fields and produce a JSON. On the other hand, for external types, you should provide their serializers as implicit just like the case for DateTime.
For BSON, however, we’re implementing our custom serializer.
The repository:
So, this is our initial version of the movie repository. Basically, it injects the execution context and the reactive mongo api. Also, it contains a helpers function that returns a FutureofBSONCollection.
The
collectionis a function to avoid potential problems in development with play auto reloading.
Once the repository is ready, we can start by adding some basic queries.
Read queries
The find method takes two arguments, the selector and the projection. In nutshell, the selector is used to match specific documents and the projector is used to project-specific fields on the documents. In our case, we want to keep things simple and stick with defaults.
The find method returns a query builder which means the query is therefore not performed yet. It allows you to add options to the query, like a sorting ordering.
Youcan learn more about the find in the mongodocumentation.
Write queries
Now, you can see the write queries. The insert insert method returns an InsertBuilder instance which you can use to insert one or many documents. Same thing for update and delete methods which return an UpdateBuilder and DeleteBuilder respectively.
The controller
Now, we reached the last part. We’ll create the endpoints to expose the actions for the movies repository.
Let’s start by creating the controller:
Now, we’ll create the two endpoints responsible of reading data:
Read data endpoints
We have two endpoints, the first one will return the movie list and the second one will parse the given id and return the associated movie if it’s found.
Create/Update/Delete endpoints
Besides validating the id passed in an argument like the previous code. Also, we check if the json is valid by using the validate helper in the request body.
Thanks to the json serialization macro created in the previous section, the Scala object can be serialized implicitly fromjson and vise-versa.
Routes
The last part is the bind the controller methods to their routes.
Testing the API
Now that our application is ready we can make simple tests with cURL.
Let’s start by creating a movie.
> curl --verbose --header "Content-Type: application/json" \
  --request POST \
  --data '{ "title":"My favorite movie", "description":"My favorite movie description" }' \
  http://localhost:9000/movies
If everything is working, you should get a similar result.
< HTTP/1.1 201 Created
< Referrer-Policy: origin-when-cross-origin, strict-origin-when-cross-origin
< X-Frame-Options: DENY
< X-XSS-Protection: 1; mode=block
< X-Content-Type-Options: nosniff
< X-Permitted-Cross-Domain-Policies: master-only
< Date: Sun, 10 Jan 2021 12:25:06 GMT
< Content-Type: application/json
< Content-Length: 75
{
  "title": "My favorite movie",
  "description": "My favorite movie description"
}*
Now with a GET request:
> curl --verbose --request GET http://localhost:9000/movies
Again, you should get a similar result.
< HTTP/1.1 200 OK
< Referrer-Policy: origin-when-cross-origin, strict-origin-when-cross-origin
< X-Frame-Options: DENY
< X-XSS-Protection: 1; mode=block
< X-Content-Type-Options: nosniff
< X-Permitted-Cross-Domain-Policies: master-only
< Date: Sun, 10 Jan 2021 12:47:34 GMT
< Content-Type: application/json
< Content-Length: 213
[
  {
    "_id": {
      "$oid": "5ffaf5b787901a6769f585f8"
    },
    "_creationDate": "2021-01-10T13:40:23.359+01:00",
    "_updateDate": "2021-01-10T13:40:23.359+01:00",
    "title": "My favorite movie",
    "description": "My favorite movie description"
  }
]*