
laying the foundation for scalability( Hexagonal Architecture In GoLang)


Hexagonal Architecture helps us to navigate these complexities, fostering a design that is loosely connected, yet cohesive. It’s not just an architectural approach, it’s a pragmatic solution for the modern software design challenges we face today.
Traditional Architecture
The traditional way of architecting an application uses what we call 3-tier architecture. Your application is split into three layers.
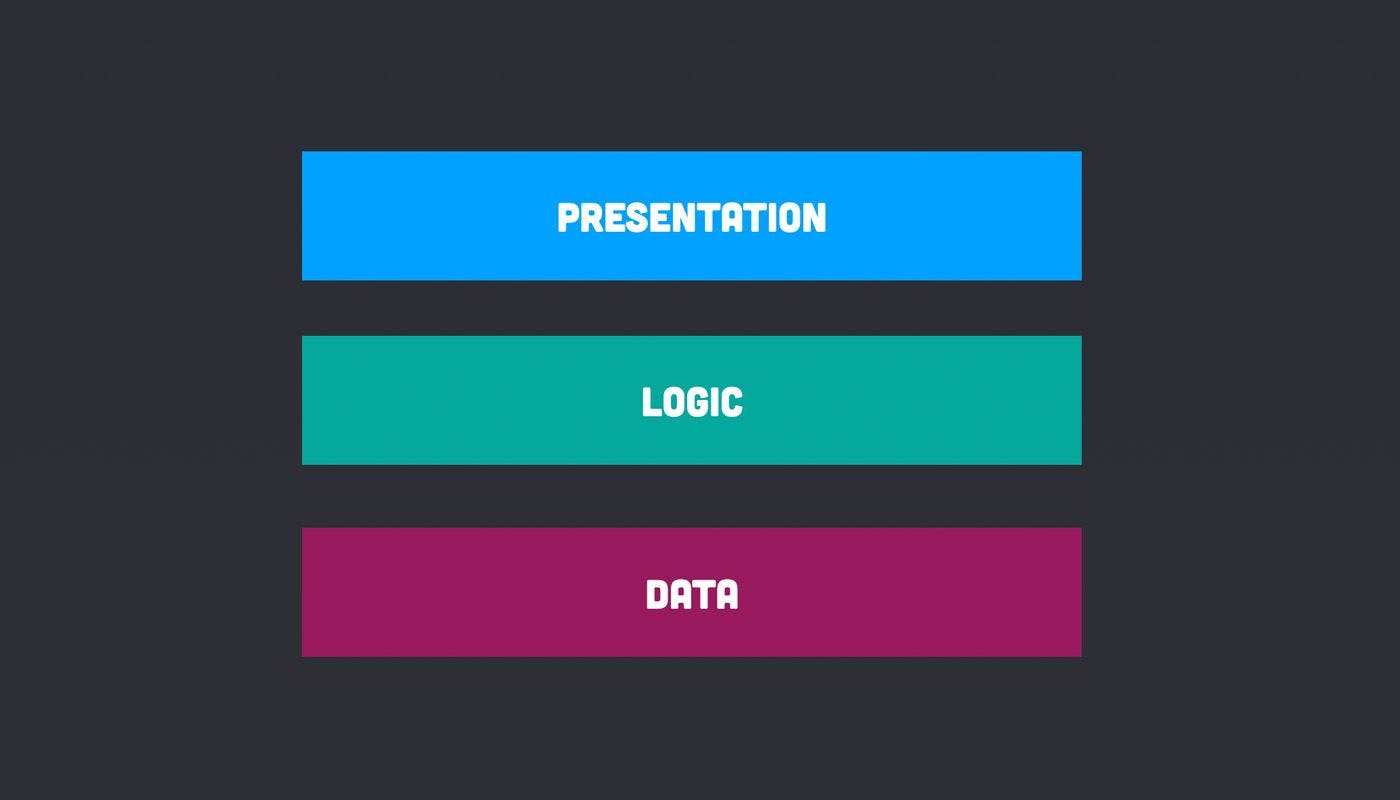
Presentation Layer
The first is the presentation layer. This is the layer that your users interact with. This could be the front end of your application or in some cases the API contract that you expose two your users.
Logic Layer
The second layer is the logic layer. As the name suggests this is the core part of your application where all the logic of your system is held.
Data Layer
Lastly, we have the data layer that controls how data is persisted in your application. This is generally a good start when trying to architect an application. However, this layered approach doesn’t say much about how these layers interact. If you are not careful it is extremely easy to make each layer highly coupled to each other.
Ports and Adapters
If it hasn’t heard of hexagonal architecture then just go heard of the ports and adapters pattern.
Ports
For each input and output to the application, we have a port. This is simply an abstraction. The application doesn’t care whether we are saving to a database, a file system or an event-based queue. All it needs to know is that there is a way to read and write data.
Adapters
All the code for actually communicating with the database happens inside the adapter. This way the application does not need to understand anything about the underlying technologies being used all this is done inside the adapter. If it has ever written a repository for a database then you will probably be familiar with the concept.
Driving (Primary) vs Driven (Secondary)
The input is driving our application to do something and the outputs are driven by the application itself.
Why is it called Hexagonal Architecture
The hexagon is just a shape to help visualise the architecture and doesn’t really have any real-world reasoning behind it.
Except, what do you think of when you see a hexagon?
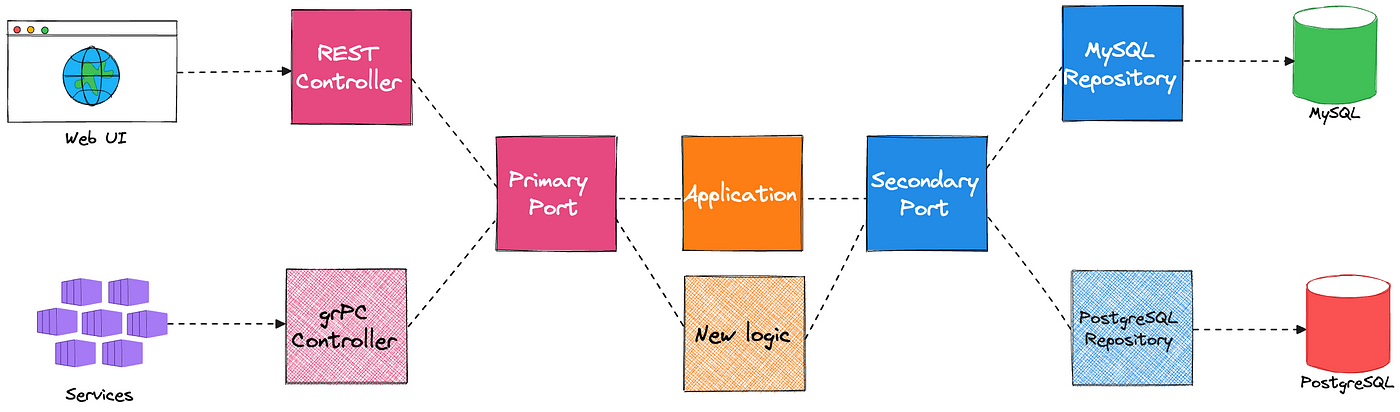
The application can have multiple inputs and ports and one of those might be an API. When we save data we generally think of saving it to a database or a filesystem. If it has a particularly large application, possible to start splitting it up into different domains. This is the concept behind domain-driven design where each application is only responsible for one domain. One domain might be user management, another might be search or data persistence. Each of these parts of your application could become its own hexagon.
When to use Hexagonal Architecture
Hexagonal architecture is great for large and continous applications that have a lot of different inputs and outputs but if there are working on a small application it is probably not worth adding in all the additional complexity.
Hexagonal architecture concept
Hexagonal represents business logic. It does not care about your framework development, your technology stack and your language code. It helps you define decoupled code structure, isolated with external components and easy-to-run tests.
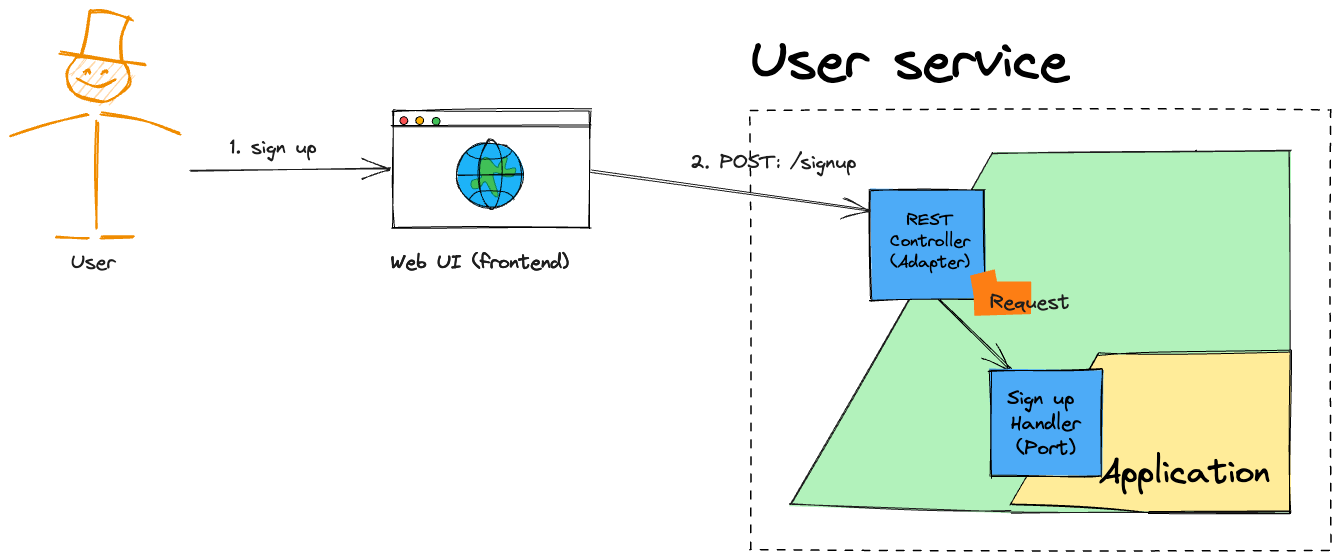
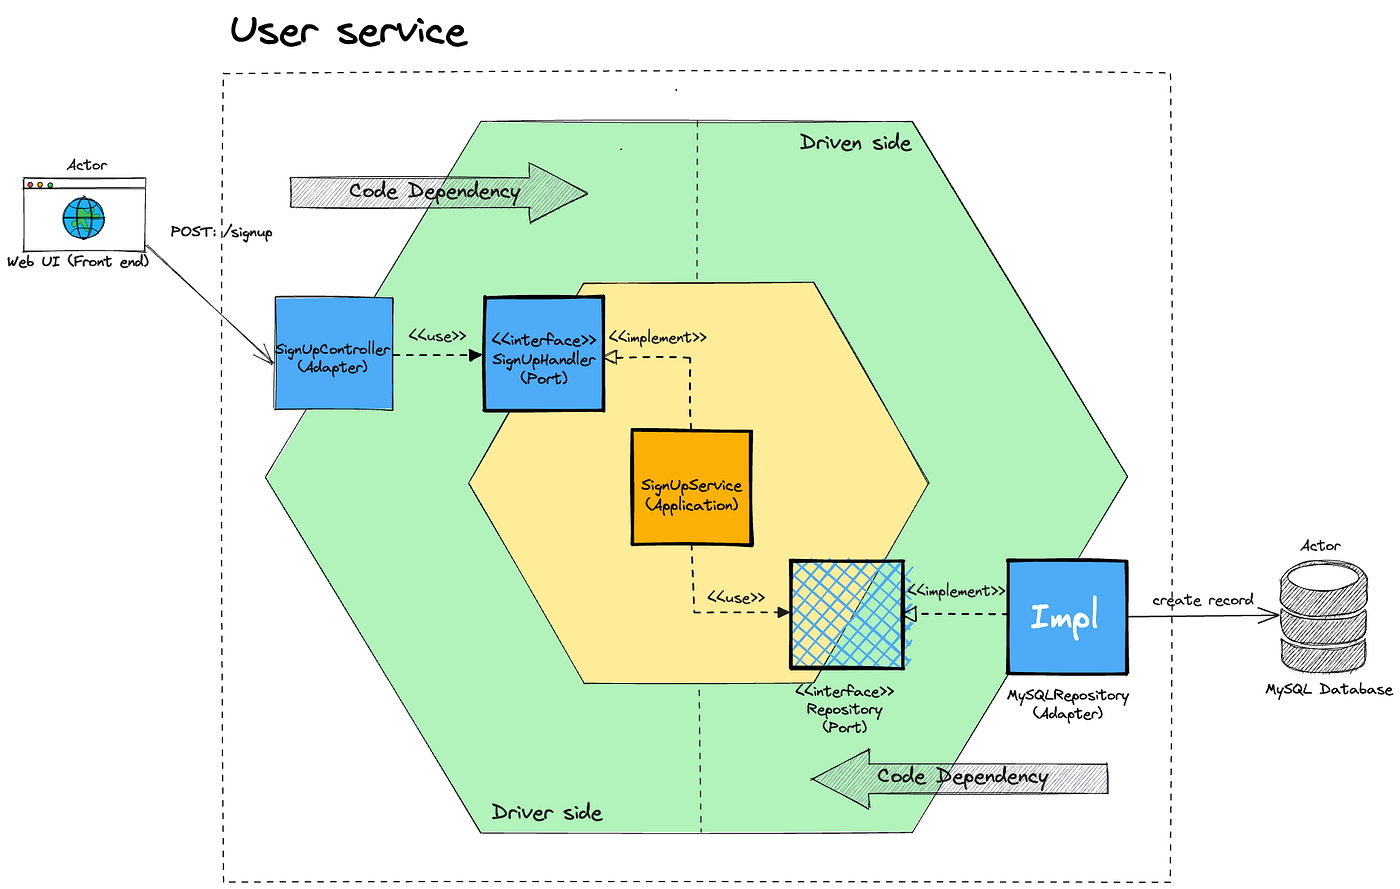
The architecture includes several important components, Let’s say I already have a GUI (Web frontend) and my task is developing a backend service. The following sequence diagram:
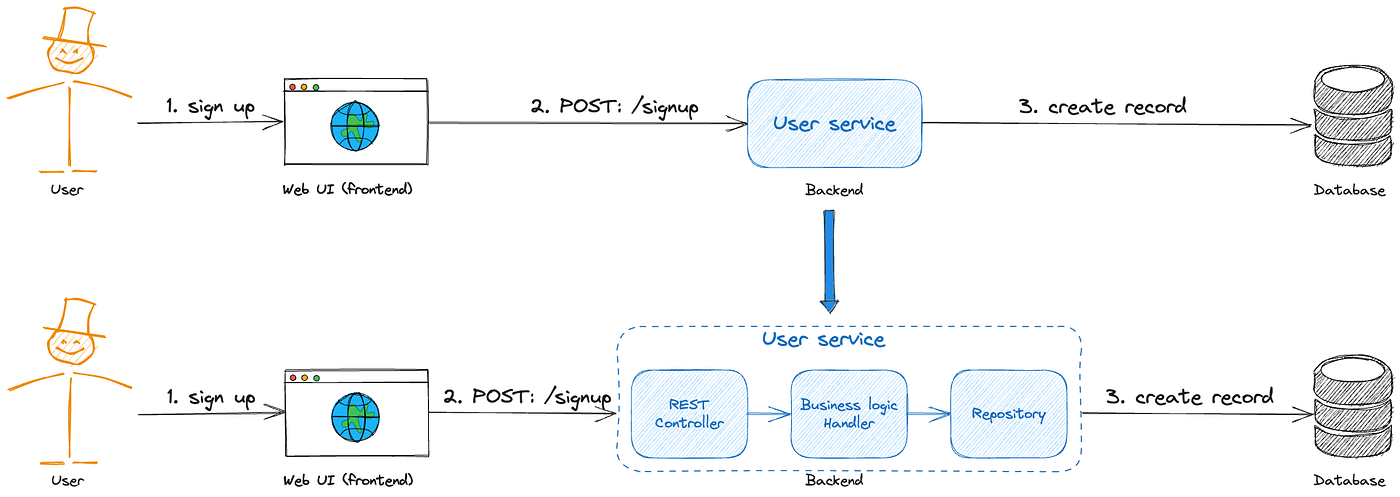
Sign up flow
Four components in this diagram: User, Web UI, User service and Database. User service provides HTPT POST API /signup for Web UI. Internal User service includes three components:
REST Controller: receives requests from Web UI through APIs. Then, it forwards them to a handler to do business logic.
Handler: validate requests and do logic. If business data needs to be stored in the database, it forwards data to the Repository. In this example, it stores a new user when a user signs up.
Repository: convert business data to data objects and send them to the database through database protocol. In this example, it sends an INSERT statement to a database when creating a new user.
Now, I will convert the above diagram to the hexagonal architecture.
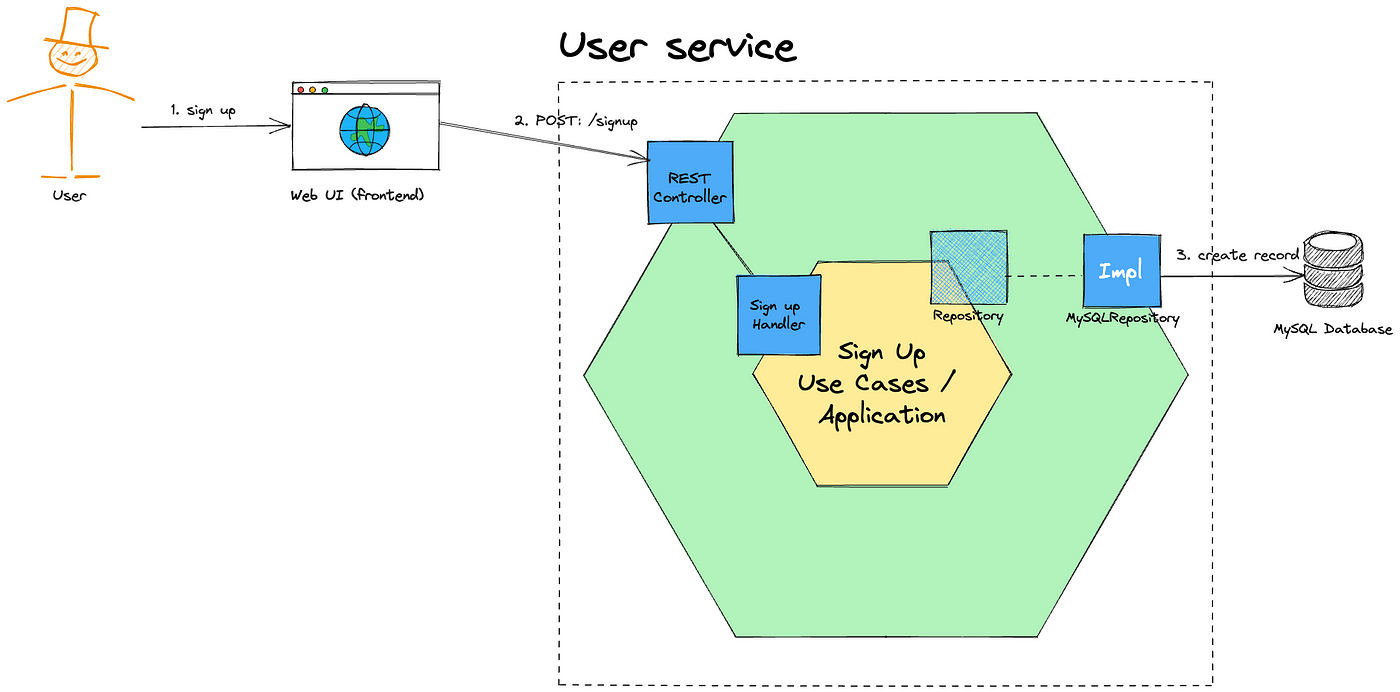
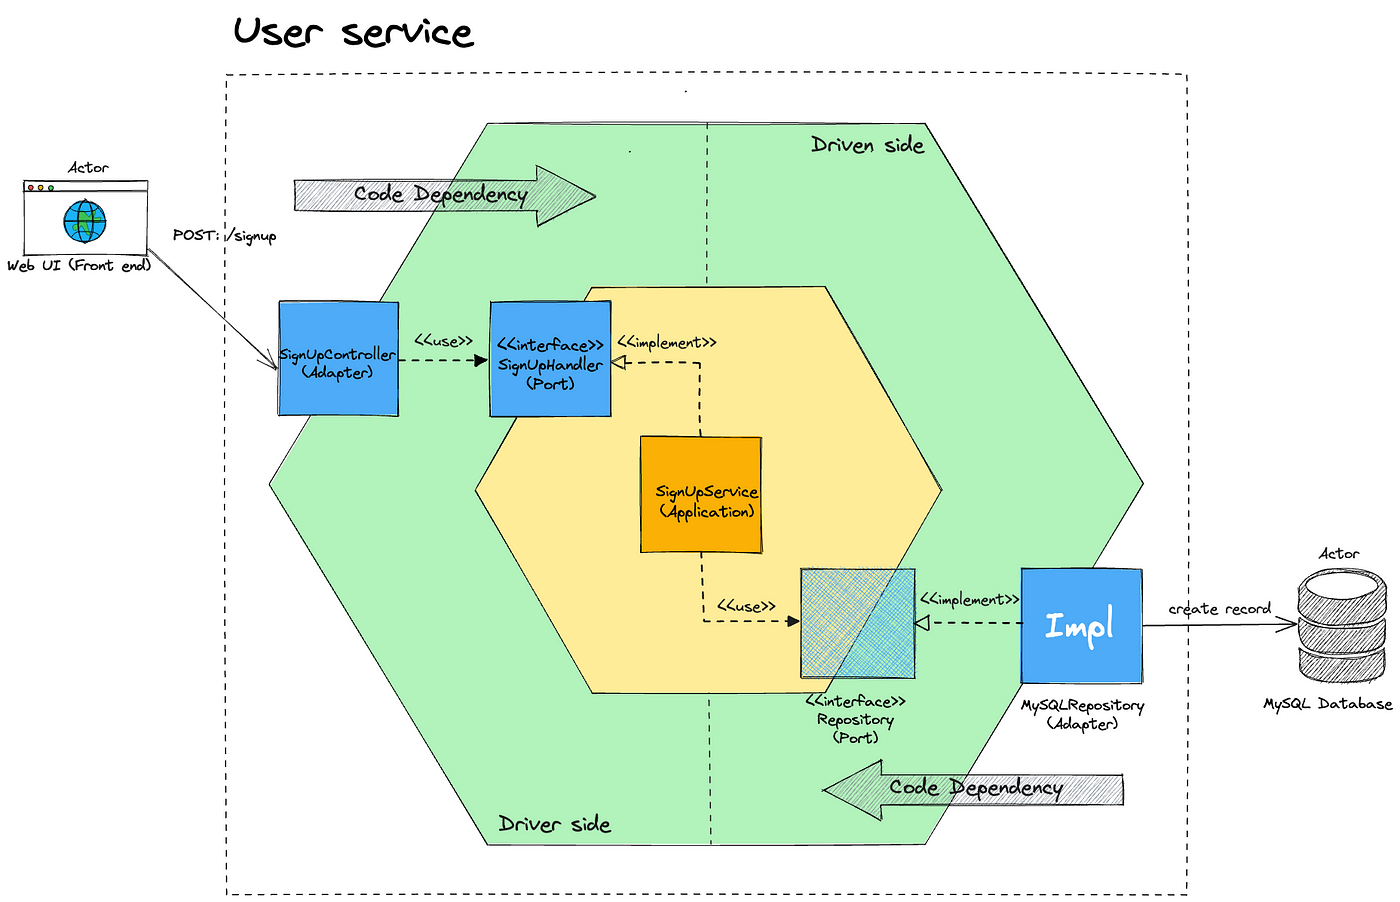
Sign up flow with Hexagonal architecture
Components of the User service are put on the edges of the hexagonal. It is easy to see that they are separated from each other. Because they have different roles, they should not be dependent on each other. When a component is changed, other components should not be affected. How can you do that?
Continue to convert the above hexagonal architecture of User service to standard hexagonal architecture.
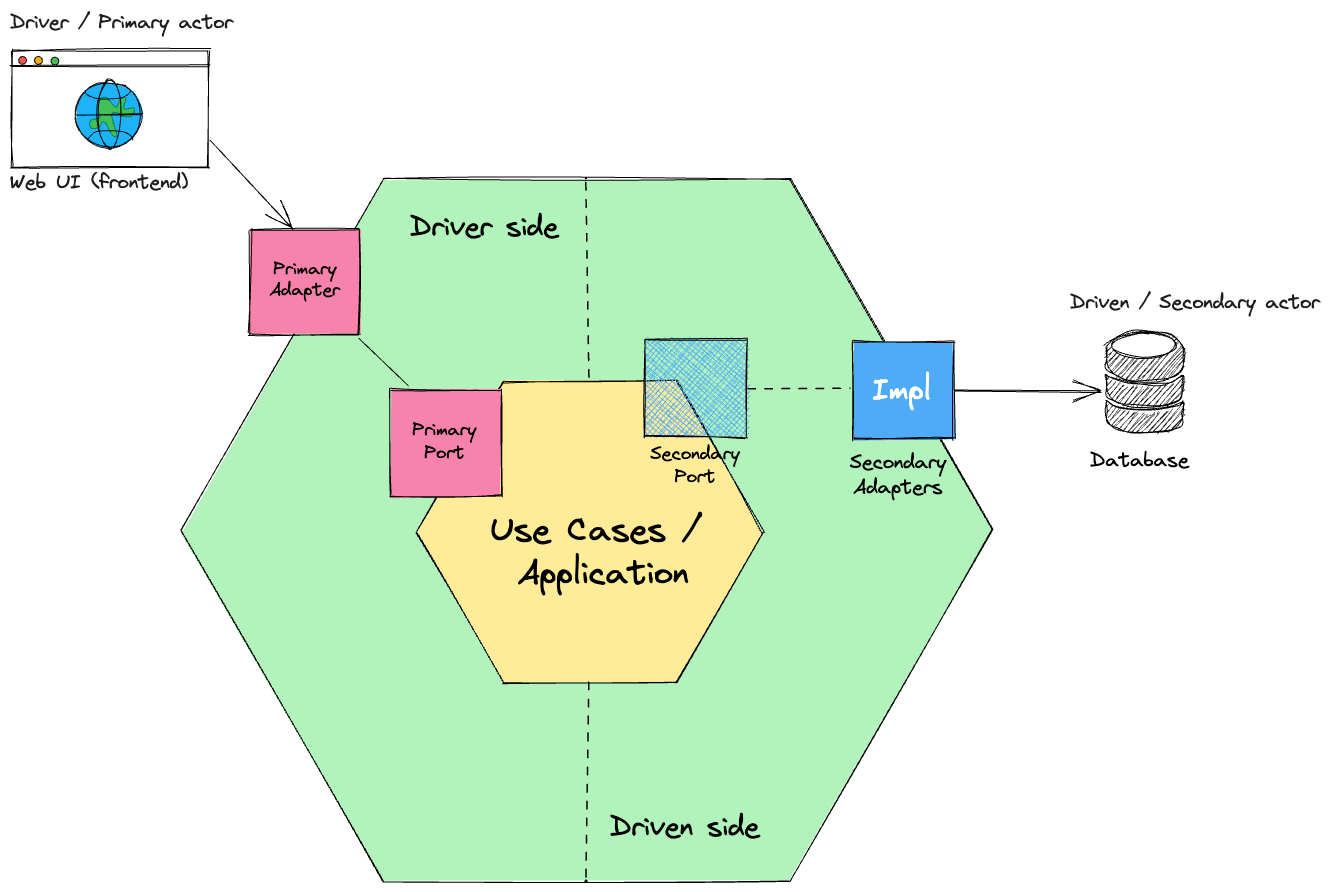
Hexagonal architecture:
Let’s learn the main components of Hexagonal architecture.
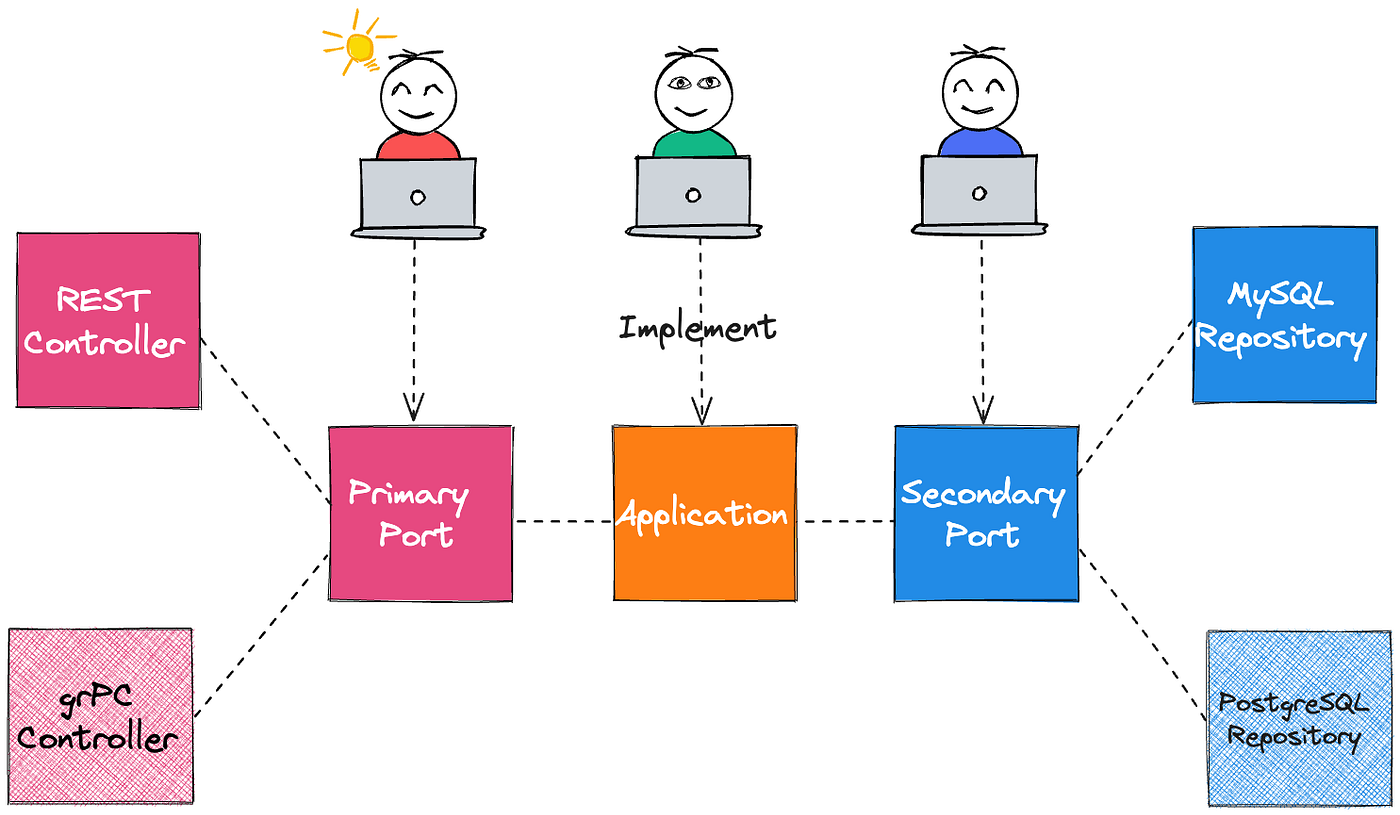
Port
Application is your business logic as core architecture. It defines Ports (interface) to communicate with external components (specific technology / outside component) such as Web UI, Database, …. Business logic only knows these ports and ports will represent specific use cases of the logic. There are two port types:
Primary Port / Driver Port: provide features of the application to the outside component. We can call them as the use case boundary of the application or the API application. For example, it provides a sign-up feature called sign-up handler.
Secondary Port / Driven Port: provide features of outside components to the application that implements business logic. For example, it provides a creating record feature in a database called a sign-up repository.
Adapter
The component to connect ports with external components is an adapter. There are two adapter types:
Primary adapter / Driver adapter: use the port interface or trigger the feature of the port to perform the business logic. It also converts requests from outside components to requests of the application.
For the above example, the REST controller is the primary adapter. It defines API POST /signup for Web UI to call. When Web UI sends a POST request to API /signup, the REST controller converts the request and sends it to the business logic through the sign-up handler (primary port).
Primary port and adapter
Secondary adapter / Driven adapter: implement the secondary port. The application uses it to communicate with outside components. It converts the request of the business logic to requests of outside technology components.
For the above example, the sign-up logic needs to create a new record in a database. It calls the repository (secondary port) to create a new record, and the MySQL repository converts this request to SQL statement “INSERT INTO user (id, username, displayname, created_at) VALUES (1, “yes”, “red”, 123456789)”.
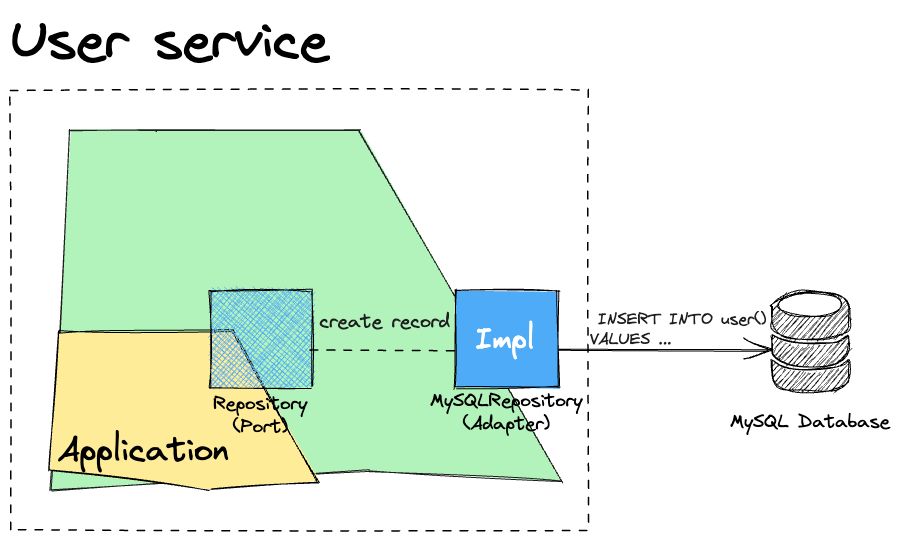
Secondary port and adapter
That means, an application only cares about a port interface and the port uses any adapter to obtain a business target. This shows the flexibility and separation between the application and the technology components.

Multiple adapter
Actor
There are two actor types:
Primary actor / Driver: use features of the application or interact with the application to achieve a business target such as Web UI, mobile application, human (customer), external applications, …
Secondary actor / Driven: provide feature to application use or triggered by application to implement the business logic. There are two driven types:
Repository: provide read and write/send features for the application such as database, cache, queue, …
Recipient: provide send feature for the application such as mail server, SMTP server, queue, …
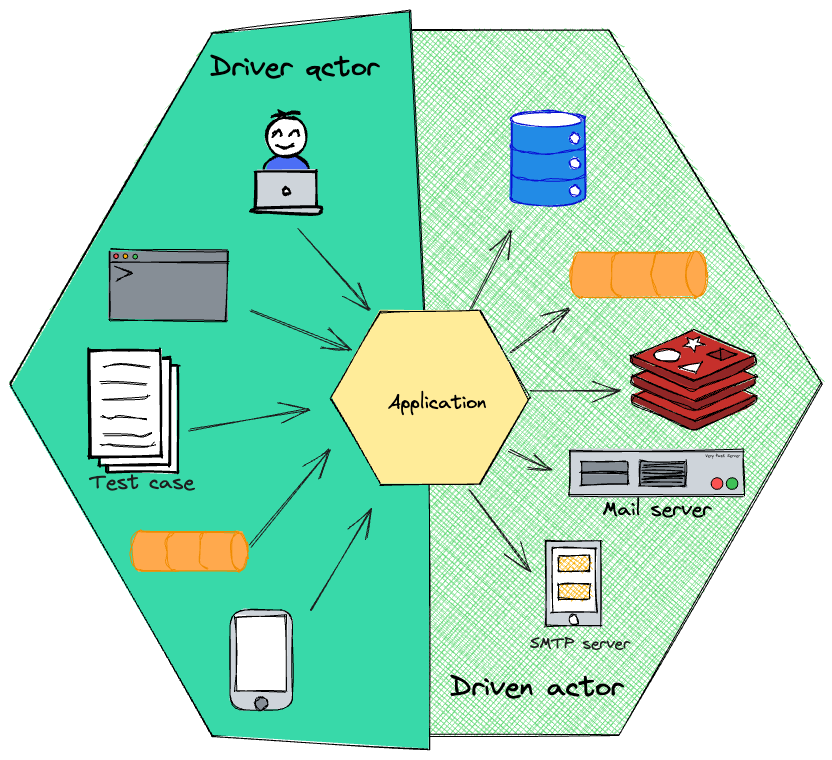
Driver and driven actor
I introduced the concept of components in the hexagonal architecture. The theory is like that, we can apply it in the project, please see the next section.
How to build a hexagonal code structure
Dependency pattern
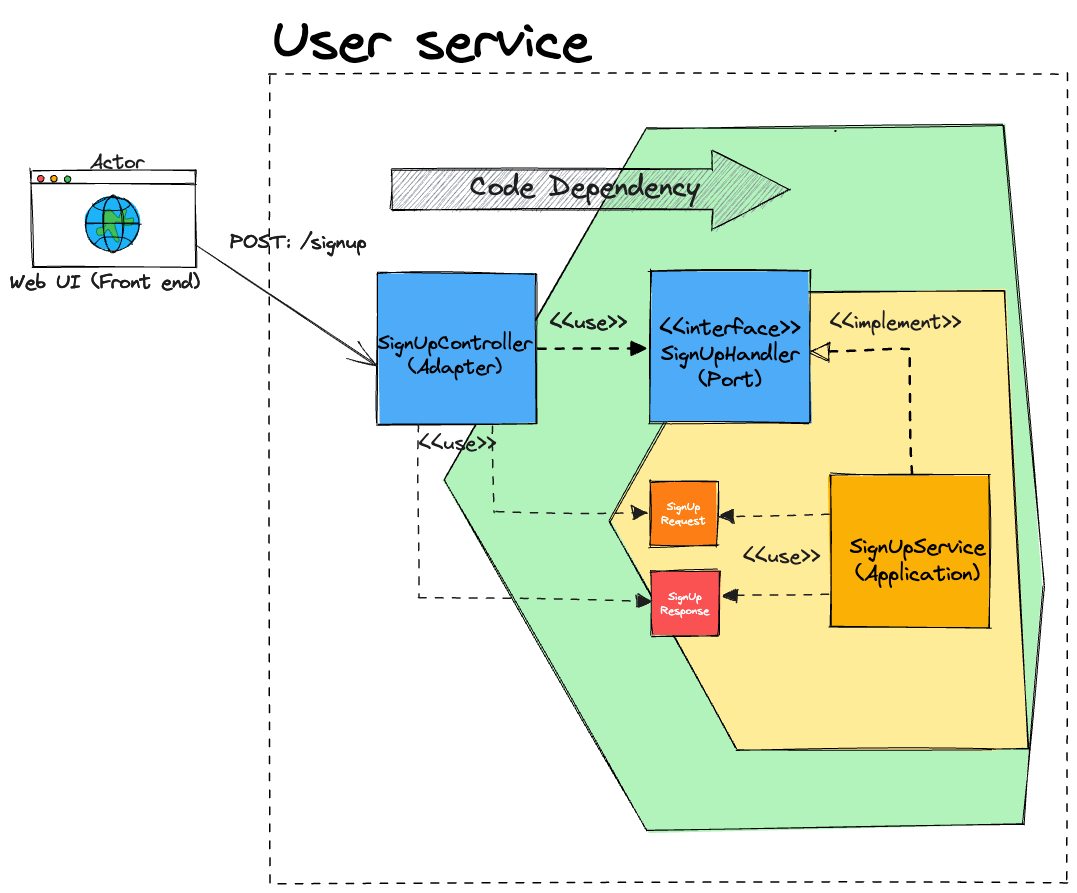
it has Mentioned two patterns that hexagonal use: Adapter Pattern and Dependency Injection. They help the architecture that is flexible and decoupled between components. How are they used in architecture? Let’s start from the driver’s side. On this side, there are four components related together: Actor, Adapter, Port and Application (business logic). This is important that outside components only communicate with an application through ports and adapters.
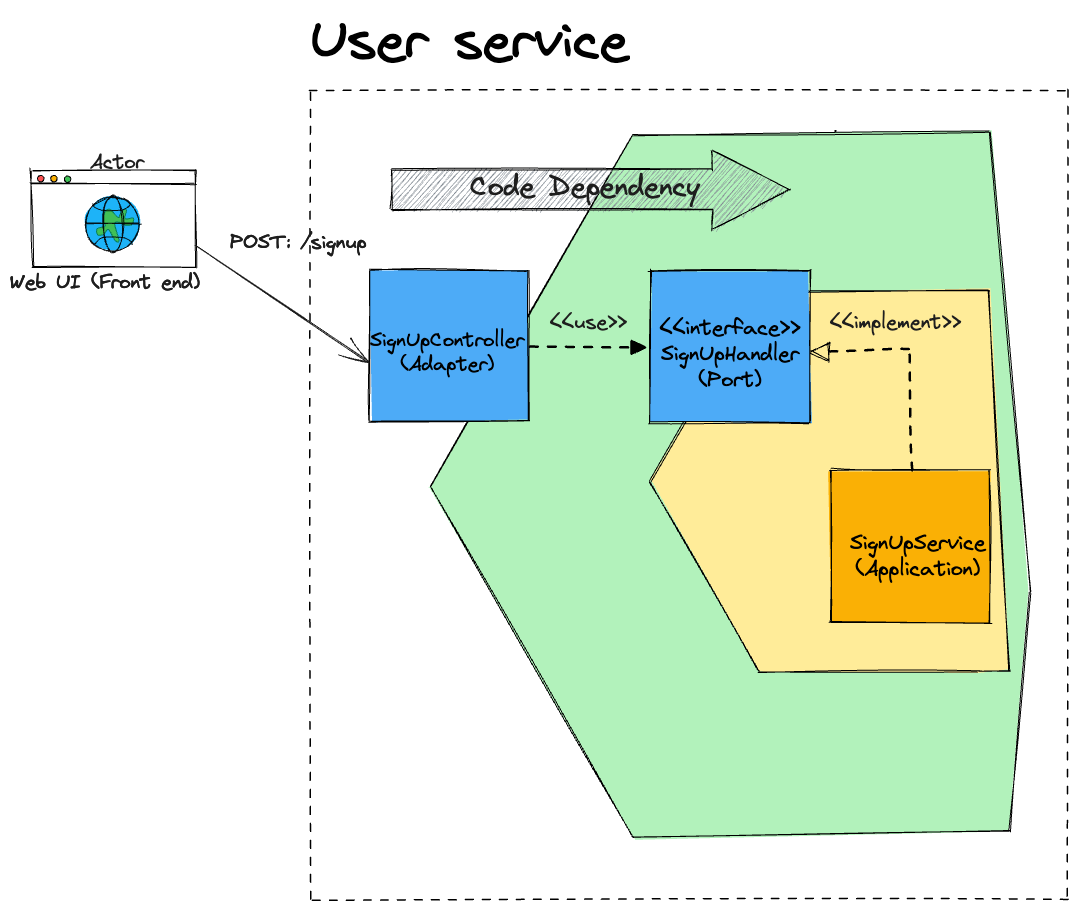
Dependency of driver side
A SignUpController class uses a SignUpHandler interface to perform a sign-up feature. SignUpService is an implementation of the SignUpHandler. It implements the sign-up function that is defined in the SignUpHandler interface. A code dependency appears between the SignUpController class and SignUpHandler interface. This is a way to implement a primary adapter and a primary port for the application.
Next, on the driven side, we also have four components related together: Actor, Adapter, Port and Application (business logic). But we have an inversion role. The application communicates with outside components through ports and adapters.
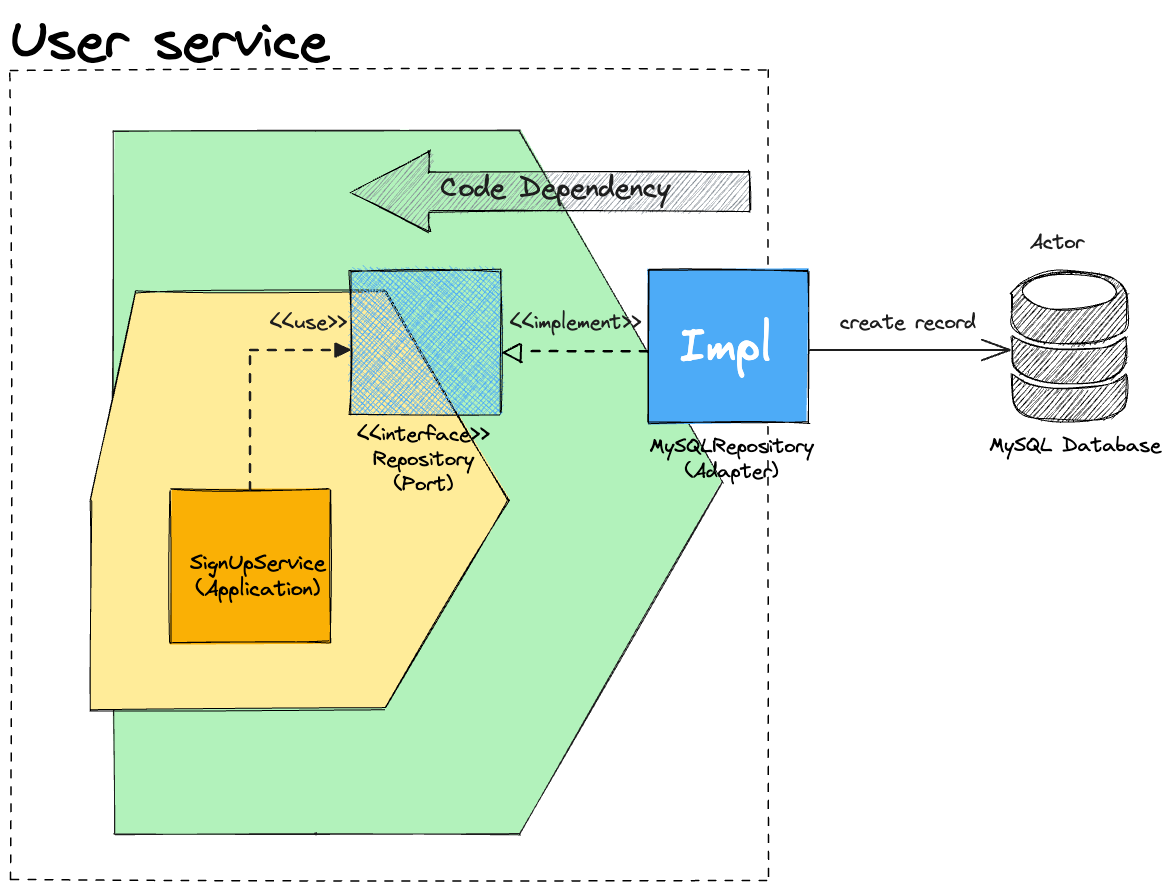
Dependency of driven side
The SignUpService class uses a Repository interface to create a new record. A MySQLRepository is an instance or implementation of the Repository. It defines a way to create records in a MySQL database. A code dependency appears between the SignUpService class with the Repository interface.
In general, we can realize that there is a dependency inversion in the hexagonal architecture. Can see a bellow model:
Dependency inversion
Data transfer between components
With the power of dependency pattern, the hexagonal architecture separates components together. How do these components communicate together? Language is a means of human-to-human communication. Components in the code structure communicate with each other by data objects.
An adapter is the communication bridge between external components and an application. Therefore, it has a role that converting data type of object that components can understand.
For example, on the driver side, a SignUpController (primary adapter) receives a request from Web UI, it needs to convert the request to a user input before sending it to a SignUpHandler. When receiving a result from the SignUpHanlder, it also converts the user output to a response of Web UI that Web UI can understand.
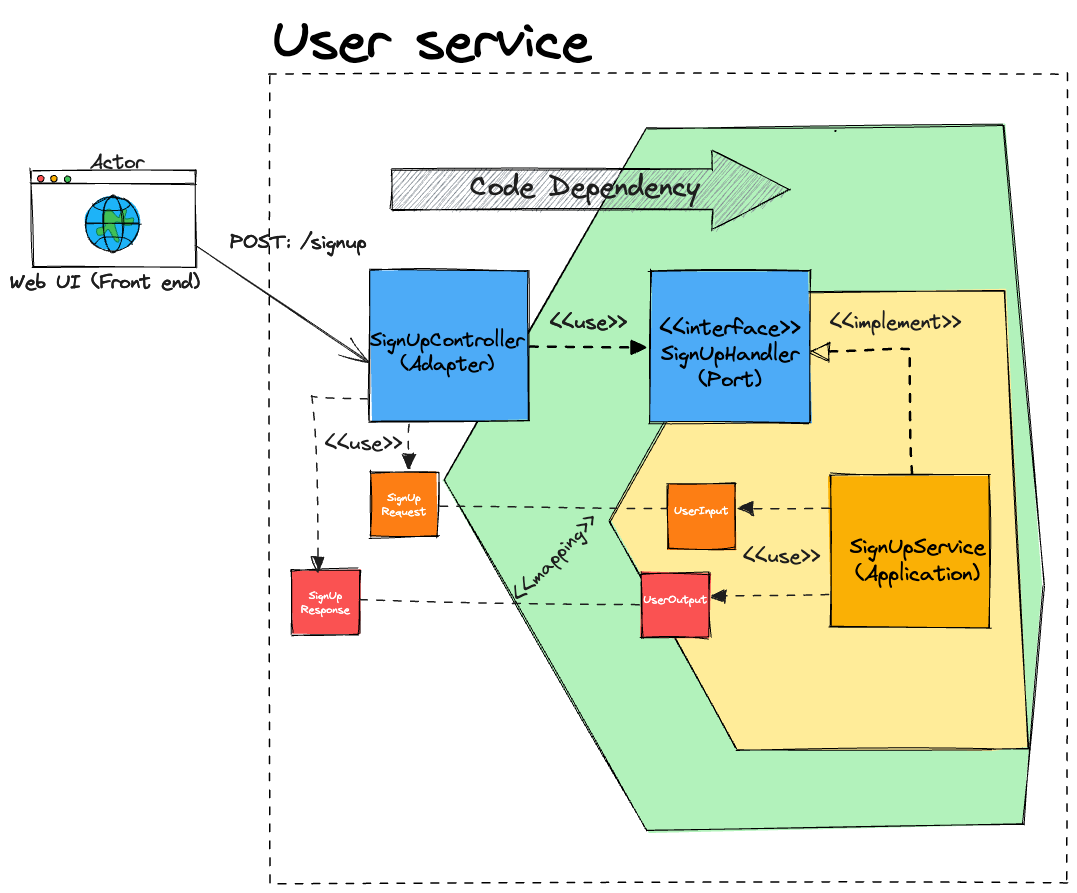
Mapping data object from primary adapter
We also use this idea for the driven side. A MySQLRepository (adapter) converts data objects between a SignUpService and a MySQL database.
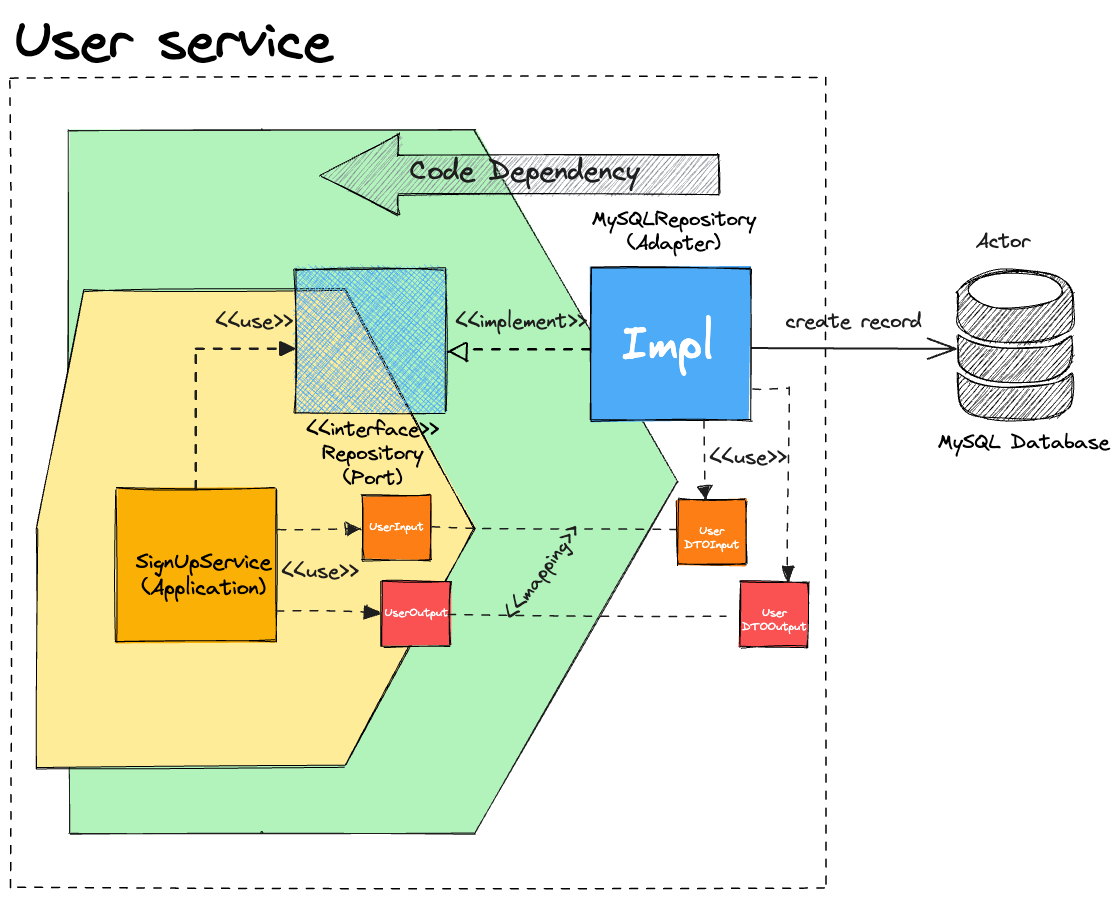
Mapping data object from secondary adapter
Costly
Converting data objects is quite costly that affects the use of memory and the performance of service. But it helps keep decoupled between components in the service. If your service does not change technology frequently, you can reuse data objects between an adapter and a port component.
For example, a SignUpController (adapter) and a SignUpHandler can use the same SignUpRequest and SignUpResponse. That means, the SignUpController sends a SignUpRequest to the SignUpHandler, then the SignUpHandler returns a SignUpResponse to the SignUpController.
Reuse data object
How to write a test with hexagonal architecture
Testing is an important step in the development cycle of a project. With the available isolation benefit of hexagonal architecture, the code structure of the project is very easy to write tests. An application controls business logic, it is an important role of the project. Therefore, we write tests from this component first.
Test an application component
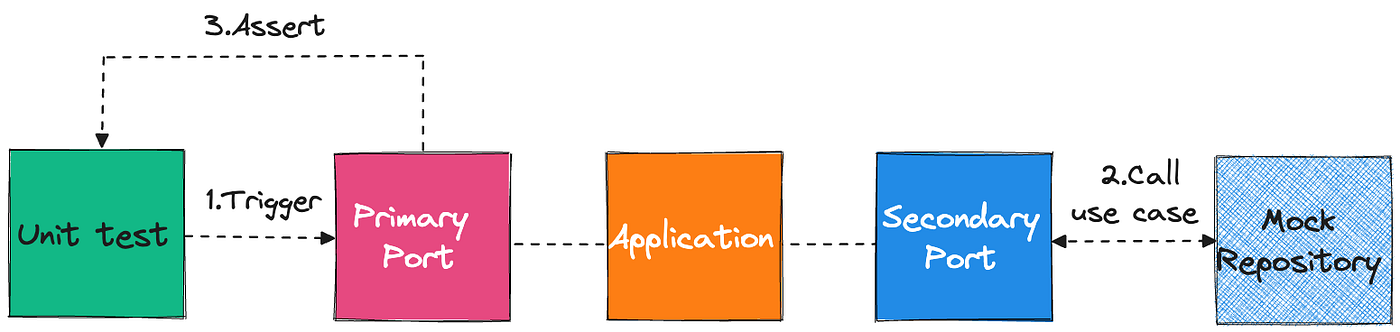
The application does not care about outside components (Web UI, database…), so we apply a test double for outside components. That means, we have to:
Write unit tests to trigger the application from a primary port.
Implement a mock instance for a secondary adapter.
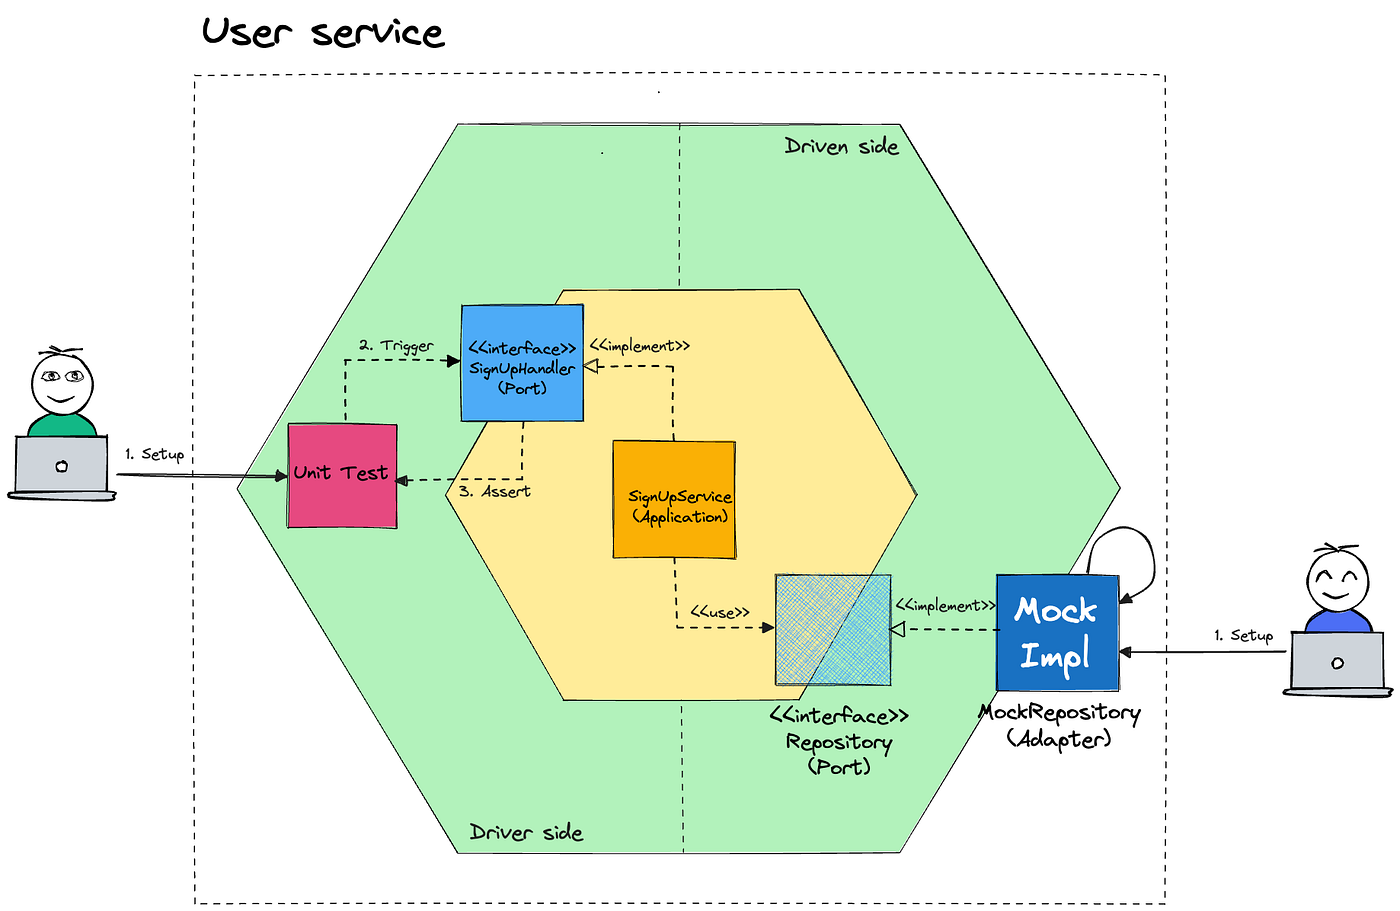
Application unit test
When writing unit tests for business logic, you have to know the expected result of these test cases and compare them with an actual result when triggering these unit tests. We need to mock a suitable state for each test case.
For example, you want to write a unit test for the case of a successful sign-up feature of a SignUpService. You need to set up that a MockRepository returns a successful result when a SignUpService calls a Repository to create a new user. Then, you assert this result with the expected result. Otherwise, you also return a duplicate user error for a failed test case.
Test an adapter component
Each component is isolated together, so we also write tests for adapter components that are isolated with business logic. Because adapters communicate with outside components, we need to use third parties to be able to run tests.
Test a primary adapter component
httpexpect (apply HTTP REST controller) to trigger the APIs of a primary adapter. There are two ways to perform a test for a primary adapter.
Keep a MockRepository as the above example and assert the result at the primary adapter component.
Or implement MockSignUpService and set up a suitable state for each test case.

Primary adapter unit test
Then, set up unit tests for the secondary adapter. following model:
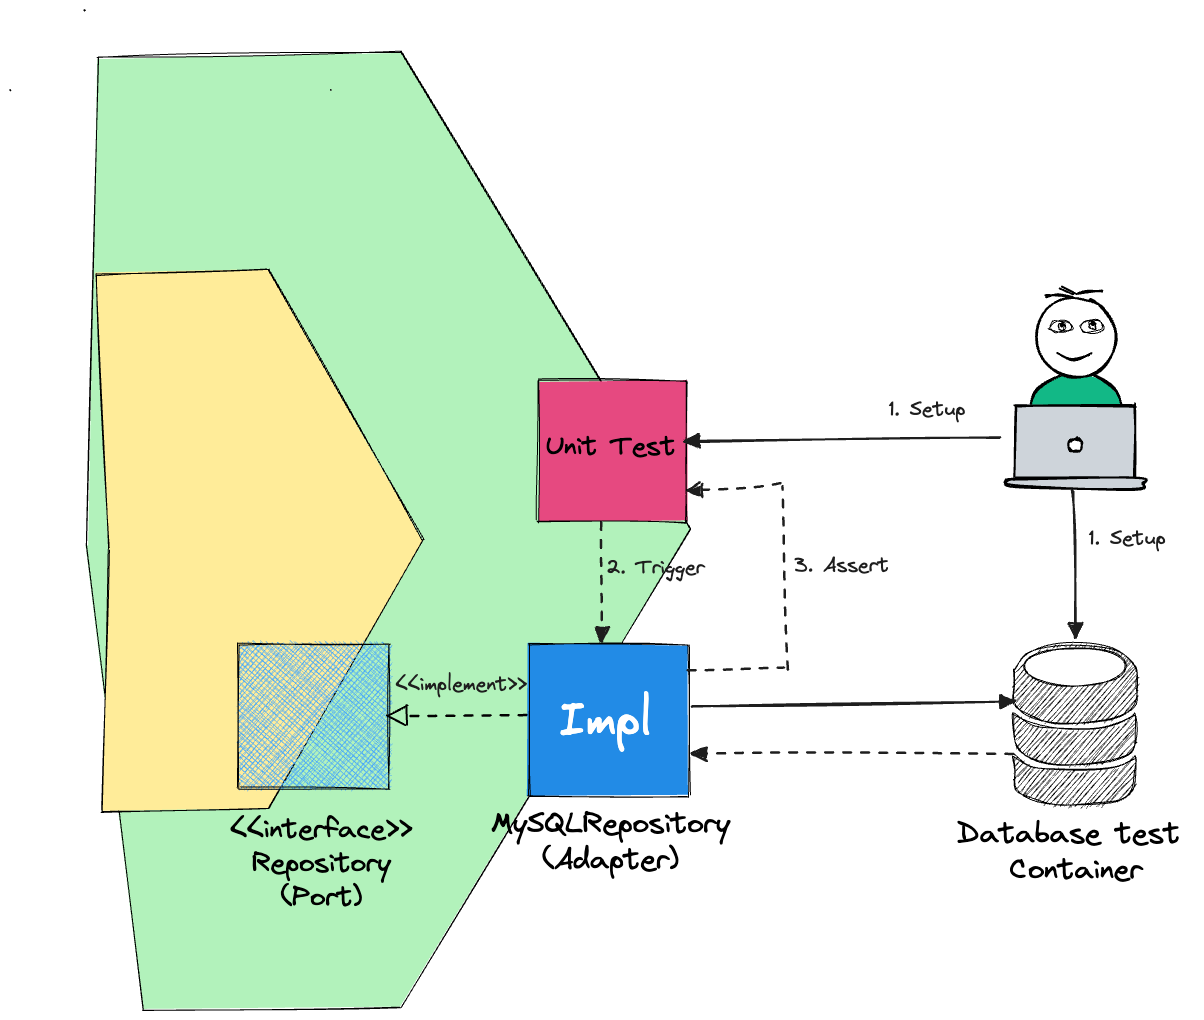
Secondary adapter unit test
Next blog, providing detailed code for unit test examples by Golang in Hexagonal architecture.
Advantages and Disadvantages
When reading the above sections, you also realize the advantages and disadvantages of hexagonal architecture for software projects, specifically backend projects.
Advantages
Isolation

it has Mention for the isolation feature. It is a highlight that makes a difference in this hexagonal architecture. It separates components in code structure: business logic, outside component and technology stack. Isolation also helps reduce the risk for your project when you change the technology stack. If changing the technology stack has a problem, you only switch using the old adapter.
Flexibility
The technology engine is an indispensable component. With this architecture, you can easily upgrade technology without updating the core (port component, business logic) of the project. You need to implement a new adapter and switch to use this adapter. Otherwise, when you change a business logic (application), you do not update the code of the adapters or port interface.
Testability
Writing tests for an application is very easy to perform. Components are isolated together, so we can write isolation unit tests for each compoent. Besides, we can use the test double mechanism to support testing.
Development and maintainability
We can implement core business logic components before choosing a technology stack. Therefore, we can improve the speed of code implementation.
Each component in the code structure can be assigned by different members of a team and members parallel develop components. The maintainer also easily modifies and adds new logic.
Disadvantages
Complexity
If your project is not large or simple business logic, you have to take quite a lot of time to build components and organize code structure. In this case, you should choose other architecture such as layer architecture for your code structure.
Mapping
the cost of mapping data objects should be considered while created isolation between components, trade-off for this action.

Hexagonal architecture really brought many benefits for developing software progress. It changes the mindset about organizing our code structure. It applies a dependency pattern and adapter pattern to create isolation and flexibility for architecture. These projects are very easy to expand, change, upgrade and test because of the separation of components. we explored the Hexagonal architecture, delving into its key concepts and the numerous advantages it offers, such as creating isolated components, enhancing project flexibility and helping easy testing. Now, we are ready to take the next step and apply this powerful architecture to our project. However, before we proceed, let’s make sure everyone is on the same page regarding the basics of Golang, as this series focuses on experiences using Golang. Join me for this exciting experience using Golang and the Hexagonal architecture!
Structure of project
I will create a project for the example of Part 1 to make it easier for you to think. I build the User service that provides a signup feature to create new accounts. Let’s take a look at our architecture first.

The structure of the project is also built based on components of Hexagonal architecture. The architecture emphasizes a clear separation of concerns and isolates the core application logic from external dependencies. Here’s how our architecture is organized:
https://github.com/redhaanggara21/redha-rgb-golang-test
https://github.com/redhaanggara21/go-hexagonal
├── Dockerfile
├── cmd
│   └── runner.go
├── conf
│   └── app.yaml
├── internal
│   ├── controller
│   │   └── controller.go
│   ├── core
│   │   ├── common
│   │   │   ├── router
│   │   │   │   └── router.go
│   │   │   └── utils
│   │   │       └── logger.go
│   │   ├── dto
│   │   │   └── user.go
│   │   ├── entity
│   │   ├── model
│   │   │   ├── request
│   │   │   │   └── request.go
│   │   │   └── response
│   │   │       └── response.go
│   │   ├── port
│   │   │   ├── repository
│   │   │   │   ├── db.go
│   │   │   │   └── user.go
│   │   │   └── service
│   │   │       └── user.go
│   │   ├── server
│   │   │   └── http_server.go
│   │   └── service
│   │       └── user.go
│   └── infra
│       ├── config
│       │   └── config.go
│       └── repository
│           ├── db.go
│           └── user.go
├── schema
│   └── schema.sql
└── script
    └── run.sh
Now, I introduce the summary role of folders:
/cmd
This directory contains the entry point of your application, in this case, the “runner.go” file. It’s where you typically define the main function and set up your application.
/internal
This directory is a fundamental part of the Hexagonal architecture as it contains the internal code of the application, separated into different packages.
/internal/controller
This package contains files responsible for handling HTTP requests and calling the appropriate core logic. For example, the “controller.go” file could define functions for handling different HTTP endpoints. It is a primary/driver adapter.
/internal/core
This package is the core application logic and is divided further into sub-packages:
common: It contains common utilities used throughout the application, such as "router.go" (for HTTP routing) and "logger.go" (for logging).dto: This package defines data transfer objects (DTOs) used for passing data between different layers.entity: It contains the domain entities, representing the core data structures used in the application.model: This package contains model structures representing specific HTTP request and response bodies.port: Here, you define interfaces (ports) that represent the required functionalities of the application. For example, “repository” interfaces define methods for accessing data and “service” interfaces define methods for business logic.server: This package contains the HTTP server setup.service: This package contains the core application services that handle business logic.
/internal/infra:
This package contains the infrastructure-related code, they are secondary/driven adapters:
config: This file handles the configuration setup and parsing.repository: This package contains implementations of the repository interfaces, such as "db.go" and "user.go," interacting with the database.
Besides, we have several other folders:
conf: This folder holds the configuration files for your application, such as the "app.yaml" file. It's where you store settings related to your application's behavior.
schema: This folder typically contains database schema files, like "schema.sql," that define the structure of the database tables.
script: This directory stores script files, such as "run.sh," which can be used for automating common tasks or executing the application.
Dockerfile: This is a file used to define the Docker image for your application, allowing you to containerize it.
LICENSE and README.md: These files contain the project's license information and the project's documentation, respectively.
By organizing the code in this way, the Hexagonal architecture promotes a clean separation between the core application logic and external dependencies, leading to greater maintainability, testability, and flexibility. It allows you to easily replace or modify external components without affecting the core application logic.
Through an introduction to the functionality of folders, we can easily visualize and understand the code structure of projects.
Organized the Code
Before begin , understanding more getting error first into the requirements of a project is good, especially if it is a SignUp feature. The Signup feature should allow users to create an account by providing a unique username and a secure password. Upon successful registration, the system should return a response indicating success, and in case of any errors, appropriate error messages should be returned.
Request and Response Models:
Start by creating the necessary request and response models to handle Signup requests and responses.
// ./internal/core/model/request/request.go

package request
type SignUpRequest struct {
 Username string `json:"username"`
 Password string `json:"password"`
}
// ./internal/core/model/response/response.go

package response

import "user-service/internal/core/entity/error_code"

type Response struct {
 Data         interface{}          `json:"data"`
 Status       bool                 `json:"status"`
 ErrorCode    error_code.ErrorCode `json:"errorCode"`
 ErrorMessage string               `json:"errorMessage"`
}

type SignUpDataResponse struct {
 DisplayName string `json:"displayName"`
}
In the “internal/core/model/request/request.go” file, we define the SignUpRequest structure, which holds the username and password information.
Defining the UserService Interface (Primary Port Component):
We define the primary port component, which is the UserService interface in "internal/core/port/service/user.go" file. This interface outlines the functionality required for handling Signup requests.
// ./internal/core/port/service/user.go

package service

import (
 "user-service/internal/core/model/request"
 "user-service/internal/core/model/response"
)

type UserService interface {
 SignUp(request *request.SignUpRequest) *response. Response
}
Implementing the UserService (Application/Business Component):
In the “internal/core/service/user.go” file, we implement the UserService interface with a concrete service called userService. This service handles the core business logic of the project. The SignUp function in this service validates the request, generates a random display name, and then saves the new user to the database using the UserRepository.
// ./internal/core/service/user.go

package service

import (
 "user-service/internal/core/common/utils"
 "user-service/internal/core/dto"
 "user-service/internal/core/entity/error_code"
 "user-service/internal/core/model/request"
 "user-service/internal/core/model/response"
 "user-service/internal/core/port/repository"
 "user-service/internal/core/port/service"
)

const (
 invalidUserNameErrMsg = "invalid username"
 invalidPasswordErrMsg = "invalid password"
)

type userService struct {
 userRepo repository.UserRepository
}

func NewUserService(userRepo repository.UserRepository) service.UserService {
 return &userService{
  userRepo: userRepo,
 }
}

func (u userService) SignUp(request *request.SignUpRequest) *response.Response {
 // validate request
 if len(request.Username) == 0 {
  return u.createFailedResponse(error_code.InvalidRequest, invalidUserNameErrMsg)
 }

 if len(request. Password) == 0 {
  return u.createFailedResponse(error_code.InvalidRequest, invalidPasswordErrMsg)
 }

 currentTime := utils.GetUTCCurrentMillis()
 userDTO := dto.UserDTO{
  UserName:    request.Username,
  Password:    request.Password,
  DisplayName: u.getRandomDisplayName(request.Username),
  CreatedAt:   currentTime,
  UpdatedAt:   currentTime,
 }

 // save a new user
 err := u.userRepo.Insert(userDTO)
 if err != nil {
  if err == repository.DuplicateUser {
   return u.createFailedResponse(error_code.DuplicateUser, err.Error())
  }
  return u.createFailedResponse(error_code.InternalError, error_code.InternalErrMsg)
 }

 // create data response
 signUpData := response.SignUpDataResponse{
  DisplayName: userDTO.DisplayName,
 }
 return u.createSuccessResponse(signUpData)
}

func (u userService) getRandomDisplayName(username string) string {
 return username + utils.GetUUID()
}

func (u userService) createFailedResponse(
 code error_code.ErrorCode, message string,
) *response.Response {
 return &response.Response{
  Status:       false,
  ErrorCode:    code,
  ErrorMessage: message,
 }
}

func (u userService) createSuccessResponse(data response.SignUpDataResponse) *response.Response {
 return &response.Response{
  Data:         data,
  Status:       true,
  ErrorCode:    error_code.Success,
  ErrorMessage: error_code.SuccessErrMsg,
 }
}
In the above code, UserDTO object for one service error_code. Structures are defined as:
// ./internal/core/dto/user.go

package dto

type UserDTO struct {
 UserName  string
 Password  string
 CreatedAt uint64
 UpdatedAt uint64
}
// ./internal/core/entity/error_code/error_code.go

package error_code

type ErrorCode string
// error code
const (
 Success        ErrorCode = "SUCCESS"
 InvalidRequest ErrorCode = "INVALID_REQUEST"
 DuplicateUser  ErrorCode = "DUPLICATE_USER"
 InternalError  ErrorCode = "INTERNAL_ERROR"
)

// error message
const (
 SuccessErrMsg  = "success"
 InternalErrMsg = "internal error"
 InvalidRequestErrMsg = "invalid request"
)
Creating the UserRepository Interface (Secondary Port Component):
To interact with the database, we create the secondary port component, the UserRepository interface, in "internal/core/port/repository/user.go" file. This interface defines the contract for inserting a new UserDTO object.
// ./internal/core/port/repository/user.go

package repository

import (
 "errors"
 "user-service/internal/core/dto"
)

var (
 DuplicateUser = errors.New("duplicate user")
)

type UserRepository interface {
 Insert(user dto.UserDTO) error
}
Implementing the UserRepository (Secondary Adapter):
The “internal/infra/repository/user.go” file contains the implementation of the UserRepository interface. This repository communicates with the database to insert a new user. It also handles any errors that might occur during the insertion process, such as duplicate user entries. It is a secondary adapter.
// ./internal/infra/

package repository

import (
 "errors"
 "strings"
 "user-service/internal/core/dto"
 "user-service/internal/core/port/repository"
)

const (
 duplicateEntryMsg = "Duplicate entry"
 numberRowInserted = 1
)

var (
 insertUserErr = errors.New("failed to insert user")
)

const (
 insertUserStatement = "INSERT INTO User ( " +
  "`username`, " +
  "`password`, " +
  "`display_name`, " +
  "`created_at`," +
  "`updated_at`) " +
  "VALUES (?, ?, ?, ?, ?)"
)

type userRepository struct {
 db repository.Database
}

func NewUserRepository(db repository.Database) repository.UserRepository {
 return &userRepository{
  db: db,
 }
}

func (u userRepository) Insert(user dto.UserDTO) error {
 result, err := u.db.GetDB().Exec(
  insertUserStatement,
  user.UserName,
  user.Password,
  user.DisplayName,
  user.CreatedAt,
  user.UpdatedAt,
 )

 if err != nil {
  if strings.Contains(err.Error(), duplicateEntryMsg) {
   return repository.DuplicateUser
  }
  return err
 }

 numRow, err := result.RowsAffected()
 if err != nil {
  return err
 }

 if numRow != numberRowInserted {
  return insertUserErr
 }

 return nil
}
To connect to the database, define first the Database interface (in "internal/core/port/repository/db.go" file) to provide database connections for the service. Additionally, we implement the database adapter in "internal/infra/repository/db.go" which sets up the connection and initializes the database driver.
// ./internal/core/port/repository/db.go

package repository

import (
 "database/sql"
 "io"
)

type Database interface {
 io.Closer
 GetDB() *sql.DB
}
And this is the database adapter:
// ./internal/infra/repository/db.go

package repository

import (
 "database/sql"
 "time"
 _ "github.com/go-sql-driver/mysql"
 "user-service/internal/core/port/repository"
 "user-service/internal/infra/config"
)

type database struct {
 *sql.DB
}

func NewDB(conf config.DatabaseConfig) (repository.Database, error) {
 db, err := newDatabase(conf)
 if err != nil {
  return nil, err
 }
 return &database{
  db,
 }, nil
}

func newDatabase(conf config.DatabaseConfig) (*sql.DB, error) {
 db, err := sql.Open(conf.Driver, conf.Url)
 if err != nil {
  return nil, err
 }

 db.SetConnMaxLifetime(time.Minute * time.Duration(conf.ConnMaxLifetimeInMinute))
 db.SetMaxOpenConns(conf.MaxOpenConns)
 db.SetMaxIdleConns(conf.MaxIdleConns)

 if err := db.Ping(); err != nil {
  return nil, err
 }

 return db, err
}

func (da database) Close() error {
 return da.DB.Close()
}

func (da database) GetDB() *sql.DB {
 return da.DB
}
At this step, we are almost done with the project. They already have a component that handles business logic (UserService) and a component that connects to the database (UserRepository and Database). Let’s take a look at the architecture to find what components we’re missing.
Creating the UserController (Primary Adapter):
We are missing an important component which is the controller (Primary adapter) of the service. Now, we need the primary adapter component, the UserController, to handle incoming HTTP requests and invoke the core application logic. The "internal/controller/controller.go" file contains the implementation of this controller. It receives HTTP requests for the Signup feature and delegates the request processing to the UserService.
// ./internal/controller/controller.go

package controller

import (
 "net/http"
 "github.com/gin-gonic/gin"
 "user-service/internal/core/common/router"
 "user-service/internal/core/entity/error_code"
 "user-service/internal/core/model/request"
 "user-service/internal/core/model/response"
 "user-service/internal/core/port/service"
)

var (
 invalidRequestResponse = &response.Response{
  ErrorCode:    error_code.InvalidRequest,
  ErrorMessage: error_code.InvalidRequestErrMsg,
  Status:       false,
 }
)

type UserController struct {
 gin         *gin.Engine
 userService service.UserService
}

func NewUserController(
 gin *gin.Engine,
 userService service.UserService,
) UserController {
 return UserController{
  gin:         gin,
  userService: userService,
 }
}

func (u UserController) InitRouter() {
 api := u.gin.Group("/api/v1")
 router.Post(api, "/signup", u.signUp)
}

func (u UserController) signUp(c *gin.Context) {
 req, err := u.parseRequest(c)
 if err != nil {
  c.AbortWithStatusJSON(http.StatusOK, &invalidRequestResponse)
  return
 }

 resp := u.userService.SignUp(req)
 c.JSON(http.StatusOK, resp)
}

func (u UserController) parseRequest(ctx *gin.Context) (*request.SignUpRequest, error) {
 var req request.SignUpRequest
 if err := ctx.ShouldBindJSON(&req); err != nil {
  return nil, err
 }

 return &req, nil
}
In the UserController's constructor function, we register the appropriate routes for the Signup feature using the "github.com/gin-gonic/gin" package. For example, we set up the /api/v1/signup endpoint to handle Signup requests. The signUp function in the UserController parses incoming requests and sends the response back to the client. If the request is invalid, it returns an appropriate error response.
Creating the HTTP Server:
The next step is to create an HTTP server to handle incoming requests. The HTTP server will serve as the entry point for our application, directing requests to the appropriate controllers for processing.
// ./internal/core/server/http_server.go

package server

import (
 "context"
 "fmt"
 "log"
 "net/http"
 "time"
 "github.com/gin-gonic/gin"
 "user-service/internal/infra/config"
)

const defaultHost = "0.0.0.0"

type HttpServer interface {
 Start()
 Stop()
}

type httpServer struct {
 Port   uint
 server *http.Server
}

func NewHttpServer(router *gin.Engine, config config.HttpServerConfig) HttpServer {
 return &httpServer{
  Port: config.Port,
  server: &http.Server{
   Addr:    fmt.Sprintf("%s:%d", defaultHost, config.Port),
   Handler: router,
  },
 }
}

func (httpServer httpServer) Start() {
 go func() {
  if err := httpServer.server.ListenAndServe(); err != nil && err != http.ErrServerClosed {
   log.Fatalf(
    "failed to stater HttpServer listen port %d, err=%s",
    httpServer.Port, err.Error(),
   )
  }
 }()

 log.Printf("Start Service with port %d", httpServer.Port)
}

func (httpServer httpServer) Stop() {
 ctx, cancel := context.WithTimeout(
  context.Background(), time.Duration(3)*time.Second,
 )
 defer cancel()

 if err := httpServer.server.Shutdown(ctx); err != nil {
  log.Fatalf("Server forced to shutdown err=%s", err. Error())
 }
}
In the “internal/core/server/http_server.go” file, we define the HttpServer interface with two methods: Start() and Stop(). The Start() method launches the server to listen for incoming requests, while the Stop() method gracefully shuts down the server when needed.
Putting It All Together — Main Function:
With all the pieces of our Signup feature in place, we are now ready to prepare the main function of our program. The main function will bring everything together and start the HTTP server, allowing the Signup feature to be accessible to users.
// ./cmd/runner.go

package main

import (
 "log"
 "os"
 "os/signal"
 "syscall"
 "github.com/gin-gonic/gin"
 "user-service/internal/controller"
 "user-service/internal/core/server"
 "user-service/internal/core/service"
 "user-service/internal/infra/config"
 "user-service/internal/infra/repository"
)

func main() {
 // Create a new instance of the Gin router
 instance := gin.New()
 instance.Use(gin.Recovery())

 // Initialize the database connection
 db, err := repository.NewDB(
  config.DatabaseConfig{
   Driver: "mysql",
   Url: "user:password@tcp(127.0.0.1:3306)/your_database_name?charset=utf8mb4&parseTime=true&loc=UTC&tls=false&readTimeout=3s&writeTimeout=3s&timeout=3s&clientFoundRows=true",
   ConnMaxLifetimeInMinute: 3,
   MaxOpenConns:            10,
   MaxIdleConns:            1,
  },
 )
 if err != nil {
  log.Fatalf("failed to new database err=%s\n", err.Error())
 }

 // Create the UserRepository
 userRepo := repository.NewUserRepository(db)

 // Create the UserService
 userService := service.NewUserService(userRepo)

 // Create the UserController
 userController := controller.NewUserController(instance, userService)

 // Initialize the routes for UserController
 userController.InitRouter()

 // Create the HTTP server
 httpServer := server.NewHttpServer(
  instance,
  config.HttpServerConfig{
   Port: 8000,
  },
 )

 // Start the HTTP server
 httpServer.Start()
 defer httpServer.Stop()

 // Listen for OS signals to perform a graceful shutdown
 log.Println("listening signals...")
 c := make(chan os.Signal, 1)
 signal.Notify(
  c,
  os.Interrupt,
  syscall.SIGHUP,
  syscall.SIGINT,
  syscall.SIGQUIT,
  syscall.SIGTERM,
 )
 <-c
 log.Println("graceful shutdown...")
}
In the main function, we create a new instance of the Gin router using gin.New(). We also add middleware to handle panic recovery with gin.Recovery().
Then, we initialize the database connection using the “mysql” driver and relevant configuration details. The repository.NewDB() function creates a new database connection instance, which will be used to interact with the database.
Using the database connection, we create a new UserRepository instance with repository.NewUserRepository(db). This repository will be responsible for handling user-related database interactions.
Next, we create the UserService by passing the UserRepository to service.NewUserService(userRepo). This service will handle the core business logic of the Signup feature.
We set up the HTTP server using server.NewHttpServer(instance, config.HttpServerConfig{Port: 8000}). The server will listen on port 8000. The httpServer.Start() function launches the server to begin handling incoming requests.
Finally, we use a channel to listen for OS signals (e.g., SIGINT, SIGTERM) to gracefully shutdown the server when necessary. When a signal is received, we call httpServer.Stop() to stop the server and perform a clean shutdown.
We handled user service that provides SignUp feature. Let’s take a look at the code diagram.
Overview diagram code
This diagram illustrates the flow of data and control between the different components of the User Service. The UserController receives HTTP requests and passes them to the UserService, which handles the business logic and interacts with the UserRepository to access the database.
                           +------------------------+
                           |     UserController     |
                           +------------------------+
                           |  - UserService         |
                           +------------------------+
                           |  + SignUp(request)     |
                           +------------------------+
                                     |
                                     | HTTP Requests/Responses
                                     |
                                     V
                           +------------------------+
                           |      UserService       |
                           +------------------------+
                           |  - UserRepository      |
                           +------------------------+
                           |  + SignUp(request)     |
                           +------------------------+
                                     |
                                     | Business Logic
                                     |
                                     V
                           +------------------------+
                           |    UserRepository      |
                           +------------------------+
                           |  - Database            |
                           +------------------------+
                           |  + Insert(user)        |
                           +------------------------+
Running
We can write a script to run the User service as:
# ./script/run.sh

#! /bin/sh
go run ../cmd/runner.go
Before running the service, we need to prepare the database schema. Create a file named schema.sql inside the schema/ directory with the following content:
-- ./schema/schema.sql

create table User
(
    username     varchar(20) not null primary key,
    password     varchar(64) not null,
    display_name varchar(20) not null,
    created_at   bigint      not null,
    updated_at   bigint      not null
)
To run the User Service, you execute the following command in the root directory of the project. The service will start running on port 8000.
# execute file run

./run.sh                                                                                                                                                              ─╯
[GIN-debug] [WARNING] Running in "debug" mode. Switch to "release" mode in production.
 - using env:   export GIN_MODE=release
 - using code:  gin.SetMode(gin.ReleaseMode)
[GIN-debug] POST   /api/v1/signup            --> user-service/internal/controller.UserController.signUp-fm (2 handlers)
2023/07/31 20:23:41 Start Service with port 8000
2023/07/31 20:23:41 listening signals...
Testing the Signup API
Now, let’s test the /api/v1/signup API using curl or any other HTTP client. In this blog, I use the curl command.
# Execute curl
curl --location 'http://localhost:8000/api/v1/signup' \                                                                                                               ─╯
--header 'Content-Type: application/json' \
--data '{
    "username": "test_abc",
    "password": "12345"
}'

# Result
{"data":{"displayName":"test_abc1690810036744"},"status":true,"errorCode":"SUCCESS","errorMessage":"success"}
execute the above curl command again, you will receive the following result with errorCode DUPLICATE_USER:
# Execute curl
curl --location 'http://localhost:8000/api/v1/signup' \                                                                                                               ─╯
--header 'Content-Type: application/json' \
--data '{
    "username": "test_abc",
    "password": "12345"
}'

# Result
{"data":null,"status":false,"errorCode":"DUPLICATE_USER","errorMessage":"duplicate user"}
Try to write the unit test
Let’s add a unit test file for the UserService component. We'll create a file named user_test.go in the internal/core/service directory.
// ./internal/core/service/user_service_test.go

package service

import (
 "testing"
 "user-service/internal/core/dto"
 "user-service/internal/core/entity/error_code"
 "user-service/internal/core/model/request"
 "user-service/internal/core/model/response"
 "user-service/internal/core/port/repository"
)

// Define a mock UserRepository for testing
type mockUserRepository struct{}

func (m *mockUserRepository) Insert(user dto.UserDTO) error {
 // Simulate a duplicate user case
 if user.UserName == "test_user" {
  return repository.DuplicateUser
 }
 // Simulate successful insertion
 return nil
}

func TestUserService_SignUp_Success(t *testing.T) {
 // Create a mock UserRepository for testing
 userRepo := &mockUserRepository{}

 // Create the UserService using the mock UserRepository
 userService := NewUserService(userRepo)

 // Test case: Successful signup
 req := &request.SignUpRequest{
  Username: "test_abc",
  Password: "12345",
 }

 res := userService.SignUp(req)
 if !res.Status {
  t.Errorf("expected status to be true, got false")
 }

 data := res.Data.(response.SignUpDataResponse)
 if data.DisplayName == "" {
  t.Errorf("expected non-empty display name, got empty")
 }
}

func TestUserService_SignUp_InvalidUsername(t *testing.T) {
 // Create a mock UserRepository for testing
 userRepo := &mockUserRepository{}

 // Create the UserService using the mock UserRepository
 userService := NewUserService(userRepo)

 // Test case: Invalid request with empty username
 req := &request.SignUpRequest{
  Username: "",
  Password: "12345",
 }

 res := userService.SignUp(req)
 if res.Status {
  t.Errorf("expected status to be false, got true")
 }

 if res.ErrorCode != error_code.InvalidRequest {
  t.Errorf("expected error code to be InvalidRequest, got %s", res.ErrorCode)
 }
}

func TestUserService_SignUp_InvalidPassword(t *testing.T) {
 // Create a mock UserRepository for testing
 userRepo := &mockUserRepository{}

 // Create the UserService using the mock UserRepository
 userService := NewUserService(userRepo)

 // Test case: Invalid request with empty password
 req := &request.SignUpRequest{
  Username: "test_user",
  Password: "",
 }

 res := userService.SignUp(req)
 if res.Status {
  t.Errorf("expected status to be false, got true")
 }

 if res.ErrorCode != error_code.InvalidRequest {
  t.Errorf("expected error code to be InvalidRequest, got %s", res.ErrorCode)
 }
}

func TestUserService_SignUp_DuplicateUser(t *testing.T) {
 // Create a mock UserRepository for testing
 userRepo := &mockUserRepository{}

 // Create the UserService using the mock UserRepository
 userService := NewUserService(userRepo)

 // Test case: Duplicate user
 req := &request.SignUpRequest{
  Username: "test_user",
  Password: "12345",
 }

 res := userService.SignUp(req)
 if res.Status {
  t.Errorf("expected status to be false, got true")
 }

 if res.ErrorCode != error_code.DuplicateUser {
  t.Errorf("expected error code to be DuplicateUser, got %s", res.ErrorCode)
 }
}
Each test function creates a new instance of the UserService with the mock UserRepository and then calls the SignUp method with the appropriate request. It then checks the response to ensure that the service behaves as expected.
To run the unit tests, you execute the following command in the root directory of the project:
go test -v ./internal/core/service
                                                                                                                                                                                               ─╯
=== RUN   TestUserService_SignUp_Success
--- PASS: TestUserService_SignUp_Success (0.00s)
=== RUN   TestUserService_SignUp_InvalidUsername
--- PASS: TestUserService_SignUp_InvalidUsername (0.00s)
=== RUN   TestUserService_SignUp_InvalidPassword
--- PASS: TestUserService_SignUp_InvalidPassword (0.00s)
=== RUN   TestUserService_SignUp_DuplicateUser
--- PASS: TestUserService_SignUp_DuplicateUser (0.00s)
PASS
ok      user-service/internal/core/service      0.203s
Conclusion
In this page, it has been successfully developed a User Service using Golang and followed the principles of the Hexagonal architecture whics is enought to present how every connection part of module. the hexagonal architecture allowed us to build a flexible and maintainable application structure, laying the foundation for scalability.
References:
https://medium.com/@briannqc/the-practical-hexagonal-architecture-for-golang-742a49bc8d89