A/B test entire Posthog
A/B testing is a strategy to split your audience between different variations of a feature / marketing effort and compare them to select the best vari

Software Engineer

Our stack is centered around Nuxt.Js 2 (Vue.js framework) and we heavily use Server-Side Rendering (SSR) to:
improve SEO scores,
loading times for marketing pages
caching content from our third-party partners.
Rudimentary A/B testing had already been implemented via Google Optimize — it was free and usable directly by marketing team. But since it relied on direct DOM editing for experiments, there was a flicker while GO first loaded in and the changes dissappeared after the affected element was redrawn (for example by v-if clause). Also the test results it provided were hard to verify, which meant the benefit was dubious at best. Still, we realized the potential for proper feature testing.
A quick search shows that there are more than a few services, who provide a varying degree of A/B(/C/D) testing and result analysis. We checked out the two big players — Optimizely & VWO — before discovering that our product analytics tool Posthog already had the functionality and was developer friendly (very similar one — Growthbook). They didn’t provide any visual editor for marketing team, but as we knew that bigger features and comprehensive tests required dev help and heavier stack anyways, we went with it. The session recordings they had was a big bonus.
Nuxt with SSR means at a lower level we have to think in two different stacks:
Regular browser rendered JS (client)
Node.js powered server (server, do not mistake it with server middleware)
As a quick reminder, one server instance can be shared for many users, while Vue instance is generated per user. We want to leverage that detail later to cache as much data as possible and reuse it for all users.
Architecture
We want a simple, SSR-friendly function which tells us if this user has feature or variant X enabled, which would allow us to switch between different text copies, components, etc.
Usually A/B testing libraries implement this functionality by assigning user an anonymous ID and then sending request to it’s API to get enabled feature flags. But out-of-the-box this approach is comes with challenges, because it could mean either long render blocking or flickering content when flag’s first arrive. At worst it would be done once in server and once in client.
First load — my worst nightmare, illustrated
PostHog implementation has a couple of tricks up it’s sleeve we can use to optimize the whole journey to under 10 milliseconds.
First — the slow (ca 600 ms) round-trip is needed at first load, because we need to know what flags are enabled for a specific user. But with PostHog, we can instead fetch feature flag definitions, which include information like:
Names and number of feature flags
Filters to target specific user group
Rollout percentages
And with those definitions, we can compute feature flags locally in the server. Ofcourse it wouldn’t help us, if we still had to request the definitions for each user & route, so we need to somehow share them between users. Thankfully Posthog instance itself will manage caching, we’ll just have to make sure the instance is persistent throughout the lifecycle.
Techy detail — “How could we show different variants based on the rollout percentage without any database?” — first question that popped inside my head. With a bit of an investigation, I saw this cool function implementation in PostHog Node, which takes in a random ID and spits out deterministically a number between 0 and 1. And over larger user group (My test showed that at 1000 users max deviation from “true” rollout percentage was only around 2.1%!).
// # This function takes a distinct_id and a feature flag key and returns a float between 0 and 1.
// # Given the same distinct_id and key, it'll always return the same float. These floats are
// # uniformly distributed between 0 and 1, so if we want to show this feature to 20% of traffic
// # we can do _hash(key, distinct_id) < 0.2
function _hash(key: string, distinctId: string, salt: string = ''): number {
  const sha1Hash = createHash('sha1')
  sha1Hash.update(`${key}.${distinctId}${salt}`)
  return parseInt(sha1Hash.digest('hex').slice(0, 15), 16) / LONG_SCALE
}
Second — Posthog allows us to bootstrap the client library. It means we’ll compute the feature flags in server and pass those same flags to client. This will result in zero feature flag GET requests for the client library.
So with those optimizations our own A/B testing pipeline will be resembling something like this, assuming that the flag definitions have already been fetched in advance.
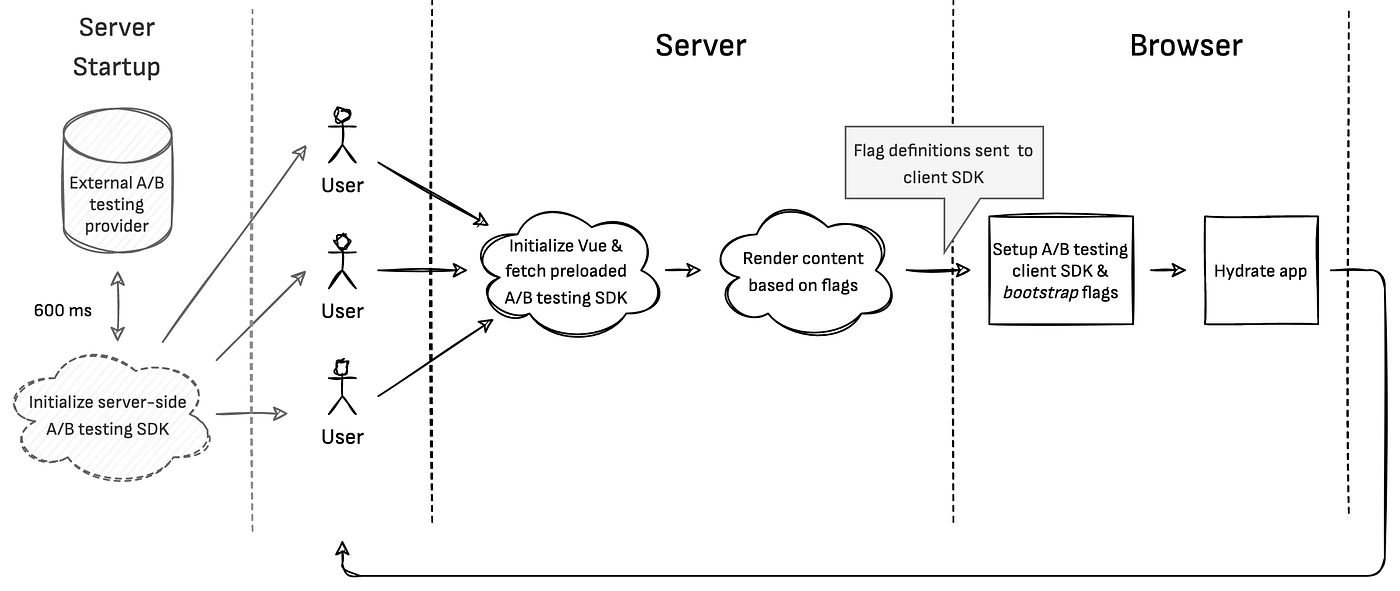
Ideal A/B testing flow for regular user request
Dependecies
I’m assuming that you already have an existing project or have scaffolded a new one. We’re going to build most of the stack ourselves to both have finer control and understanding what’s happening under the hood, so let’s first install some packages with npm.
posthog-js: ^1.36.0
posthog-node: ^2.2.0
cookie-universal-nuxt: ^2.2.1
uuid: ^8.3.2
Important note: Our implementation assumes that Posthog JS uses cookies as it’s persistent storage(default option).
Implementation
Starting from server-side, we’ll need a way to initialize PostHog instance and share it to all future requests. Luckily Nuxt module hooks enable us to share it, but the documentation is lacking.
First create a new file under modules folder, I called mine posthog-node-module.js. Then let’s import PostHog, initialize it with our tokens and inject it for everybody to use.
Documentation for the Posthog-Node is available here: https://posthog.com/docs/integrate/server/node
What to note here — we enabled preloadFeatureFlags, which means the flags will be loaded immediately before any request is made.
Note from docs: New feature flag definitions are polled every 30 seconds by default, which means there will be up to a 30 second delay between you changing the flag definition, and it reflecting on your servers. You can change this default on the client by setting
featureFlagsPollingIntervalduring client initialisation.
// modules/posthog-node-module.js

import { PostHog } from 'posthog-node';

export default function (_moduleOptions) {
  // Start module only with `nuxt dev` or `nuxt start`, not when building server
  if (!this.options.dev && !this.options._start) {
    return;
  }
  /*
   * Each time Posthog is initialized, it will have to make one request to the server to get feature flag definitions.
   * Since PH Node itself is for Server-Side use, it's stateless / indifferent to current user, allowing it to be shared
   */
  const token = 'your-posthog-PROJECT-API-key';
  const posthogServerSide = new PostHog(token, {
    host: 'your-posthog-url',
    personalApiKey: 'your-posthog-PERSONAL-API-key',
    preloadFeatureFlags: true,
  });


  /* This here injects our shared PostHog instance to ssrContext, which our A/B testing plugin can get and inject */
  /* https://stackoverflow.com/questions/60046814/nuxt-js-how-to-cache-axios-call-at-server-side-for-all-clients/60760719#60760719 */
  this.nuxt.hook('vue-renderer:ssr:prepareContext', (ssrContext) => {
    ssrContext.$posthogServerSide = posthogServerSide;
  });
}
Now we can get the instance by calling context.app.$posthogServerSide in server-side plugins and components.
We know that we want to send feature flags and distinct ID (which we used for calculation) from server to client and one way to do that is by using VueX state management. So let’s create a simple store with four variables:
// store/testing/index.js

export const state = () => ({
  isServerFirstTimeLoad: false, // did we assign a new Distinct ID from server
  serverDistinctId: '',
  serverFeatureFlags: [],
  bootstrapRequired: false, // should we bootstrap client with server data
});

export const mutations = {
  SET_SERVER_FIRST_TIME_LOAD: function (state, isFirstTimeLoad) {
    state.isServerFirstTimeLoad = isFirstTimeLoad;
  },
  SET_SERVER_DISTINCT_ID: function (state, distinctId) {
    state.serverDistinctId = distinctId;
  },
  SET_SERVER_FEATURE_FLAGS: function (state, serverFeatureFlags) {
    state.serverFeatureFlags = serverFeatureFlags;
  },
  SET_SERVER_BOOTSTRAP: function (state, shouldBootstrapFromServerData) {
    state.bootstrapRequired = shouldBootstrapFromServerData;
  },
};
Let’s also setup Posthog Client by creating a regular plugin and injecting created client to context. It’s reasonable to keep the client separate from testing plugin, because you’ll probably use it for generic analytics aswell. There’s a good principle — separation of concerns.
// plugins/posthog.js

import posthog from 'posthog-js';
import Vue from 'vue';
export default function ({ app: { router, $config, store } }, inject) {
  const bootstrap = {};
  // Let's bootstrap flags and distinct ID
  if (store.state.testing.bootstrap) {
    if (store.state.testing.serverFirstTimeLoad) {
      bootstrap.distinctID = store.state.testing.serverDistinctId;
    }
    bootstrap.featureFlags = store.state.testing.serverFeatureFlags;
  }

  //ref: https://posthog.com/docs/integrate/client/js#config
  posthog.init($config.POSTHOG, {
    bootstrap: bootstrap,
    capture_pageview: false,
    rageclick: true,
    disable_session_recording: false,
  });
  // Inject PostHog into the application and make it available via this.$posthog (or app.$posthog)
  inject('posthog', posthog);
}
Now we have all the pieces ready to implement our universal plugin for A/B testing & feature flags. Here we will do two things:
We will be implementing a wrapper (
TestingSuite) for both client & server-side SDK’s, which simplifies the use for end users and gives us finer control over flag consistency over session / etc (further details at the end).On plugin initialization, we’ll start
TestingSuitewith data from cookies (returning user) or random generated ID (first load).
// plugins/testing-suite.js

import Vue from 'vue';
import { v4 as uuidv4 } from 'uuid';

// Wrapper for Posthog Node & Posthog JS SDK-s, exposes functions only related to feature testing
class TestingSuite {
  constructor({ distinctId, client, enabledFeatureFlags }) {
    this._distinctId = distinctId;
    this._client = client;
    this._enabledFeatureFlags = enabledFeatureFlags || {};
  }

  async getFeatureFlag({ experimentFeatureFlagKey }) {
    if (process.client) {
      const featureFlag = this._client.getFeatureFlag(experimentFeatureFlagKey);
      return featureFlag;
    } else {
      /* Since Posthog Node itself doesn't have persistence for user feature flags, we try to first compute locally using provided data */
      let featureFlag = this._computeFeatureFlagLocally(experimentFeatureFlagKey);

      if (featureFlag === false) {
        featureFlag = await this._client.getFeatureFlag(
          experimentFeatureFlagKey,
          this._distinctId,
          {
            onlyEvaluateLocally: true,
          }
        );
      }
      return featureFlag;
    }
  }

  // Internal function, which will be used before PostHog if we have data already available from cookie
  _computeFeatureFlagLocally(experimentId) {
    if (!this._enabledFeatureFlags || !this._enabledFeatureFlags[experimentId]) {
      return false;
    }
    return this._enabledFeatureFlags[experimentId];
  }

  async getAllFlags() {
    // Flag consistency is important for us, so we use both sources, but prioritize flags already savedc in cookies*/
    if (process.server) {
      const posthogFeatureFlags = await this._client.getAllFlags(this._distinctId, {
        onlyEvaluateLocally: true,
      });
      return { ...posthogFeatureFlags, ...this._enabledFeatureFlags };
    }

    throw new Error('Tried to call getAllFlags in client!');
  }
}
// ====== End of wrapper ======


export default async function (
  { app: { router, $config, $cookies, $posthog, $posthogServerSide, store } },
  inject
) {
  let testingSuite = null;

  if (process.server) {
    const token = 'your-posthog-public-token';

    //ref: line 73 @ https://github.com/PostHog/posthog-js/blob/4402212fe114595b09f23fbb25e3462dce6d37bd/src/posthog-persistence.ts
    const persistenceCookieKey = `ph_${token}_posthog`;
    const persistenceCookie = $cookies.get(persistenceCookieKey);

    let distinctId = '';
    let enabledFeatureFlags = null;

    if (persistenceCookie) {
      distinctId = persistenceCookie.distinct_id;
      /* If available, let's also fetch feature flags to provide better consistency */
      if (persistenceCookie.$enabled_feature_flags) {
        enabledFeatureFlags = persistenceCookie.$enabled_feature_flags;
      }
    } else {
      /* This is first time load for this user (no previous identity data available) */
      distinctId = uuidv4();
      store.commit('testing/SET_SERVER_FIRST_TIME_LOAD', true);
      store.commit('testing/SET_SERVER_DISTINCT_ID', distinctId);
    }
    testingSuite = new TestingSuite({
      distinctId: distinctId,
      client: $posthogServerSide,
      enabledFeatureFlags: enabledFeatureFlags,
    });

    const allFlags = await testingSuite.getAllFlags();
    store.commit('testing/SET_SERVER_BOOTSTRAP', true);
    store.commit('testing/SET_SERVER_FEATURE_FLAGS', allFlags);
  } else {
    testingSuite = new TestingSuite({
      client: $posthog,
    });
  }
  inject('testingSuite', testingSuite);
}
Now we just need to wire all our modules and plugins to the config file. Since they’re all different, I’m just showing what you should add:
...
plugins: [
  ...
  {
    src: '~/plugins/posthog.js',
    mode: 'client',
  },
  {
    src: '~/plugins/posthog-ssr.js',
    mode: 'server',
  },
  {
    src: '~/plugins/testing.js',
  },
],
...
modules: [
  ...
  '~/modules/posthog-node-module.js',
],
...
Usage
Before we can start using our new testing suite, we’ll need to define our experiments in PostHog’s user interface. You can access all defined experiments from the side panel.
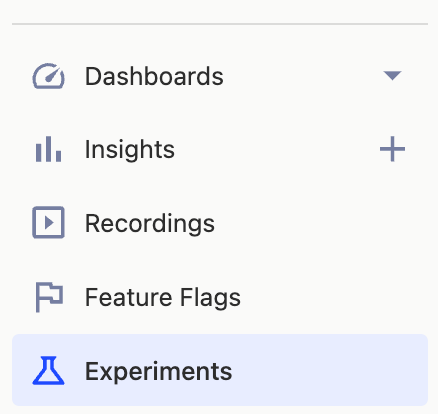
Experiments tab
When definining a new experiment, we’ll need two things:
Feature flag key — unique ID for our experiment (
our_experiment_key)Experiment variants — all variants enabled for this experiment (
control, test)
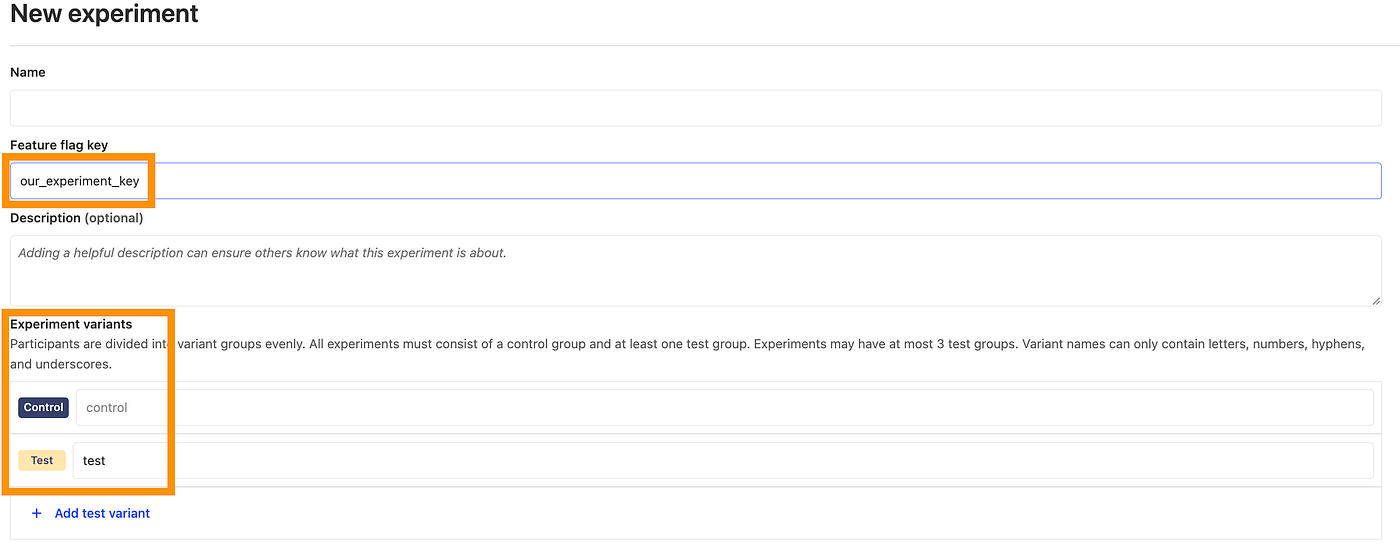
“Create an experiment” interface
After defining those parameters, save the experiment. Now we can easily implement it in our code using getFeatureFlag. Here is a sample component, which will show new, to be tested, or old, control, content to our users.
<template>
  <div v-if="flag === 'test'">
    This new content will be showed for "test" user group
  </div>
  <div v-else>
    This old content will be shown to all "control" group users, also if anything goes wrong this is fallback.
  </div>
</template>

<script>
export default {
  name: 'SampleComponent',
  async fetch() {
    const featureFlag = await this.$testingSuite.getFeatureFlag({ experimentId: 'our-experiment-key' });

    this.flag = featureFlag;
  },
  data() {
    return {
      flag: null,
    };
  },
};
</script>
And it’s that easy! Now you’ll be able to actually know, which of your features have the biggest impact and prioritize accordingly.
In our case we use headless CMS (storyblok) heavily and A/B testing is used by our content & marketing team, so we went a step further and built this feature as no-code implementation, allowing to test new content and ideas without any developers present.


